
Is data on Backup & Disaster Recovery appliance encrypted?
Can I transfer files over VNC connection to or from a virtual machine booted on the Backup & Disaster Recovery appliance?
Jumbo frame MTU support
What are the RAID levels in different Backup & Disaster Recovery appliances?
Does disaster recovery backup agent need to run as domain admin?
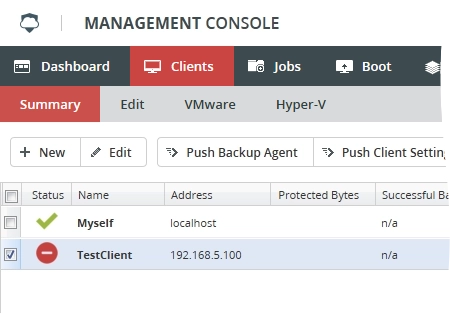
How to delete a client from Backup & Disaster Recovery appliance
How to restrict access from the Dashboard to Backup & Disaster Recovery appliance
How to configure disaster recovery image backup on Backup & Disaster Recovery appliance
How to back up Microsoft SQL Server database as flat file
How to back up Oracle databases
How to connect to the Hybrid Cloud DR appliance via VPN
These instructions use Shrew Soft VPN Client (Standard edition) for Windows as an example. If you use another VPN client, or another operating system, the routine may differ somewhat.
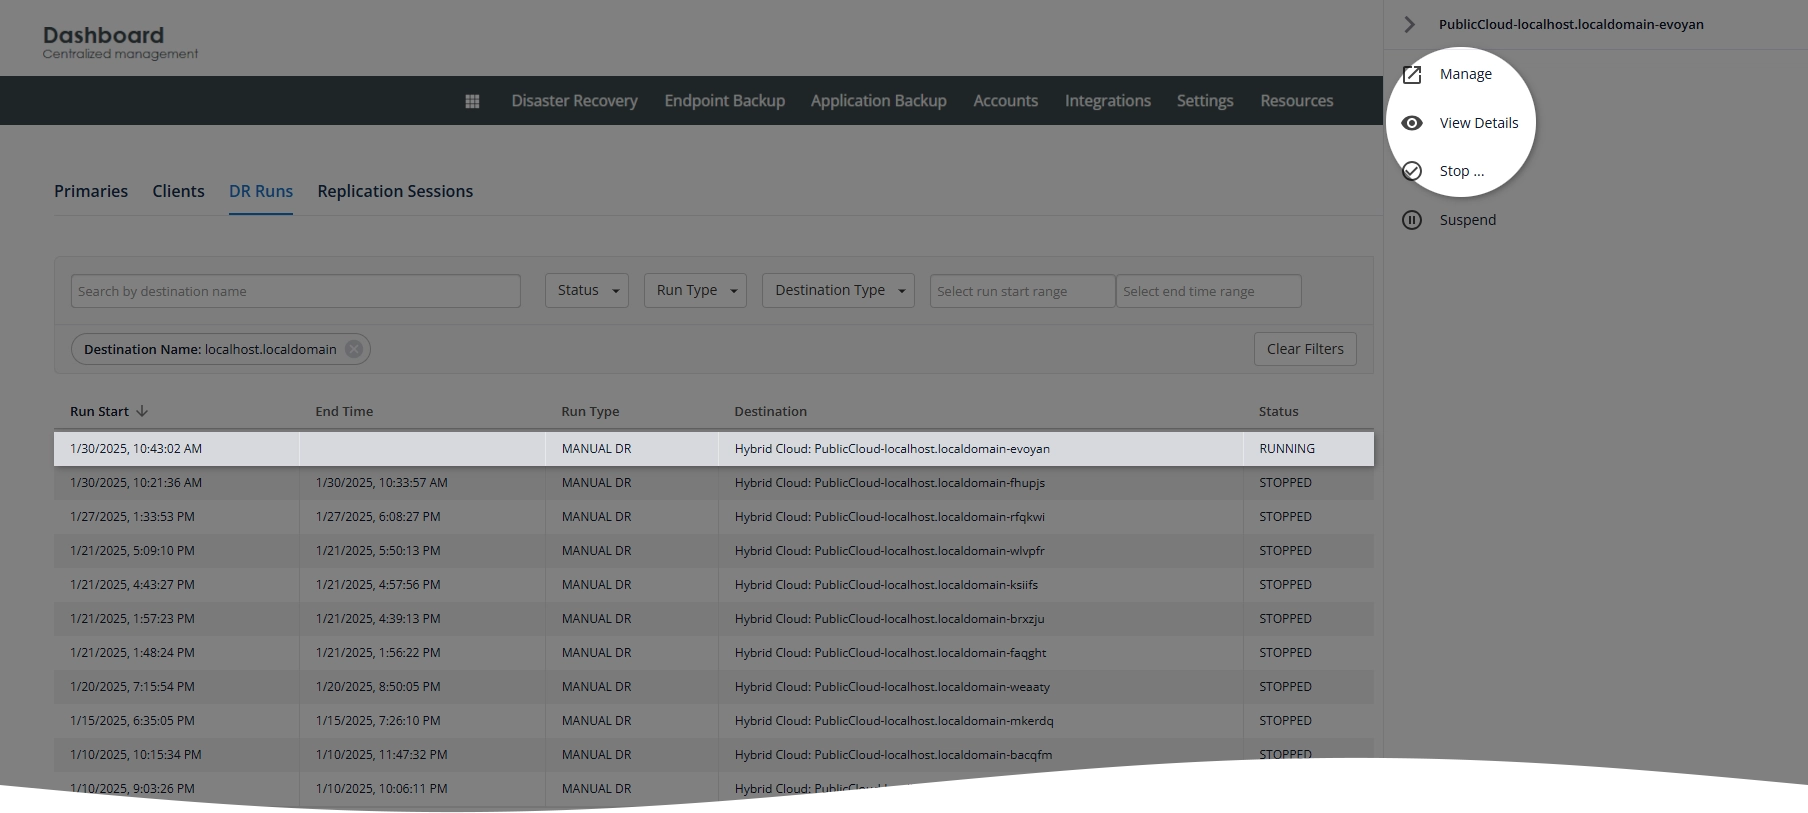
In the Infrascale Dashboard, go to Disaster Recovery › Hybrid Cloud Status.
On the DR Runs tab, find and click a DR run you need to connect to, then click View Details in the left pane that opens.
The DR run must be booted, that is – must have the RUNNING status (see the Status column).
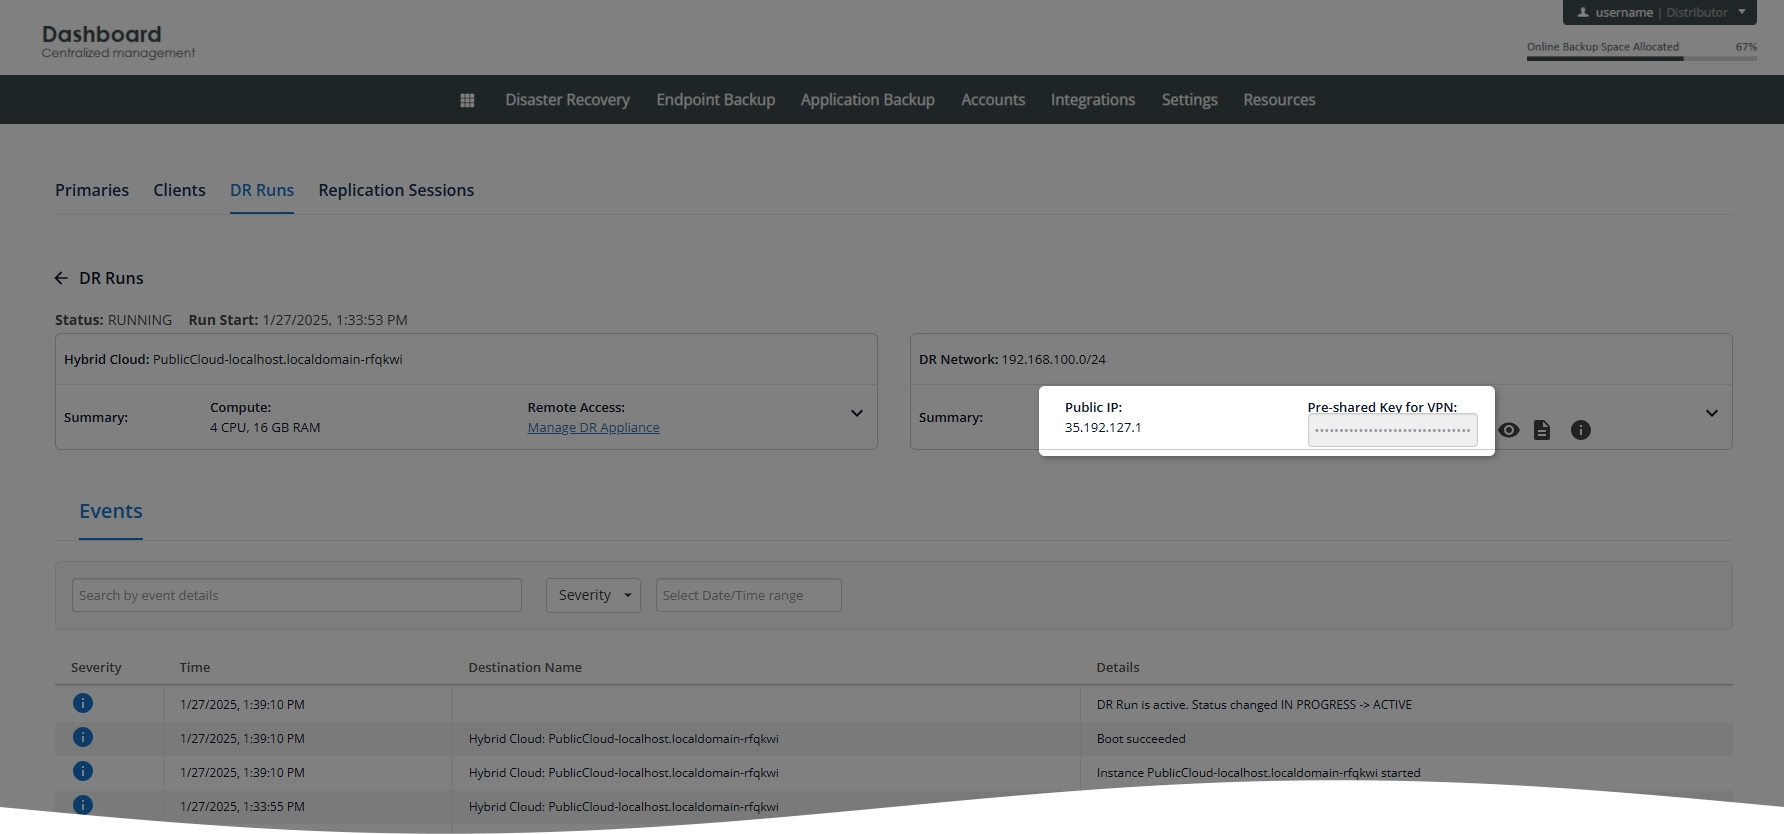
On the right side of the DR run details page, note Public IP and Pre-shared Key for VPN – these will be used later to establish the VPN connection.
Download and install the VPN client.
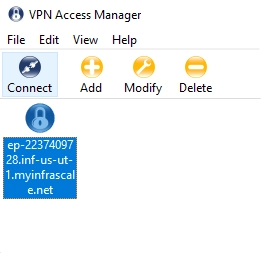
Open the VPN client (VPN Access Manager), and click Add (or Edit › Add).
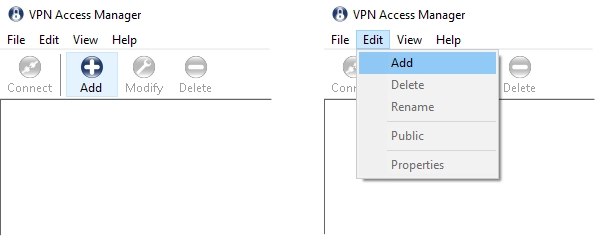
The VPN Site Configuration dialog box opens.
On the General tab, in the Host Name or IP Address box, enter the public IP address you have noted in the DR run details page.
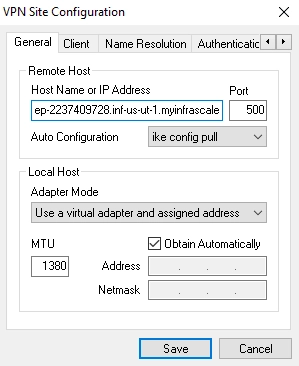
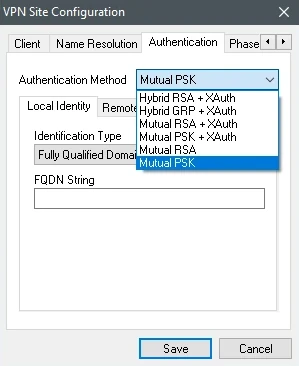
On the Authentication tab:
In the Authentication Method drop-down list, select Mutual PSK.
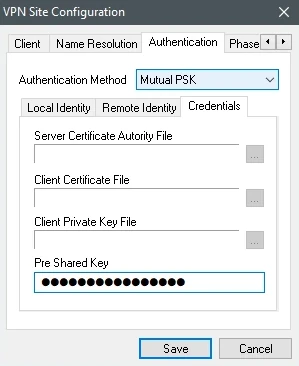
On the Credentials subtab, in the Pre Shared Key box, enter the pre-shared key for VPN you have noted on the DR run details page.
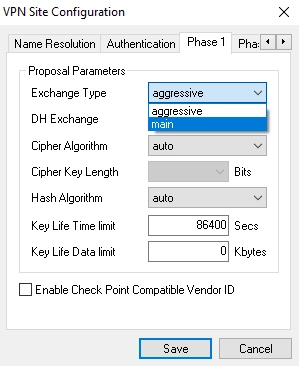
On the Phase 1 tab, in the Exchange Type drop-down list, select main.
Click Save to apply changes.
Select the newly created configuration, and then click Connect.
The VPN Connect dialog box opens.
On the Connect tab, click Connect to establish the VPN connection.
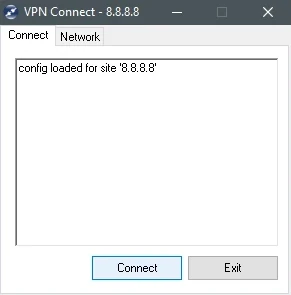
The VPN client will show
tunnel openedafter it establishes the connection successfully.
How to pause all scheduled jobs for all clients on Backup & Disaster Recovery appliance at once
How to perform system state restore
How to prevent automatic deletion of backup jobs
The following information applies both to the primary and to the secondary appliances.
By default, a backup job can be deleted automatically:
under the retention settings, or
if the respective client is deleted or unregistered, and the Backup & Disaster Recovery appliance was configured to delete the orphaned jobs.
To prevent automatic deletion of a backup job in those cases, you can pin the job as follows:
In the appliance Management Console, go to Jobs › History.
Right-click a successfully completed job, and then click Pin Job.
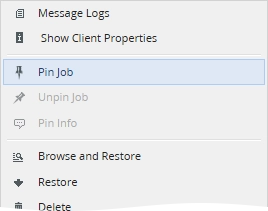
Also, you can select a job, and then click Pin Job on the toolbar.
In the Pin Job dialog:
In the Date Until Pinned combo box, set the date, by which the job will stay pinned.
In the Comments box, enter a comment, and then click OK.
Pinned jobs are indicated by a checkmark in the Pinned column. You can sort and filter the jobs by this status.
To unpin a job, right-click the pinned job, and then click Unpin Job.
To view or edit the details of a pinned job, right-click the pinned job, and then click Pin Info.
How to reset Changed Block Tracking for VMware virtual machines
To reset Changed Block Tracking (CBT) for a VMware virtual machine (VM):
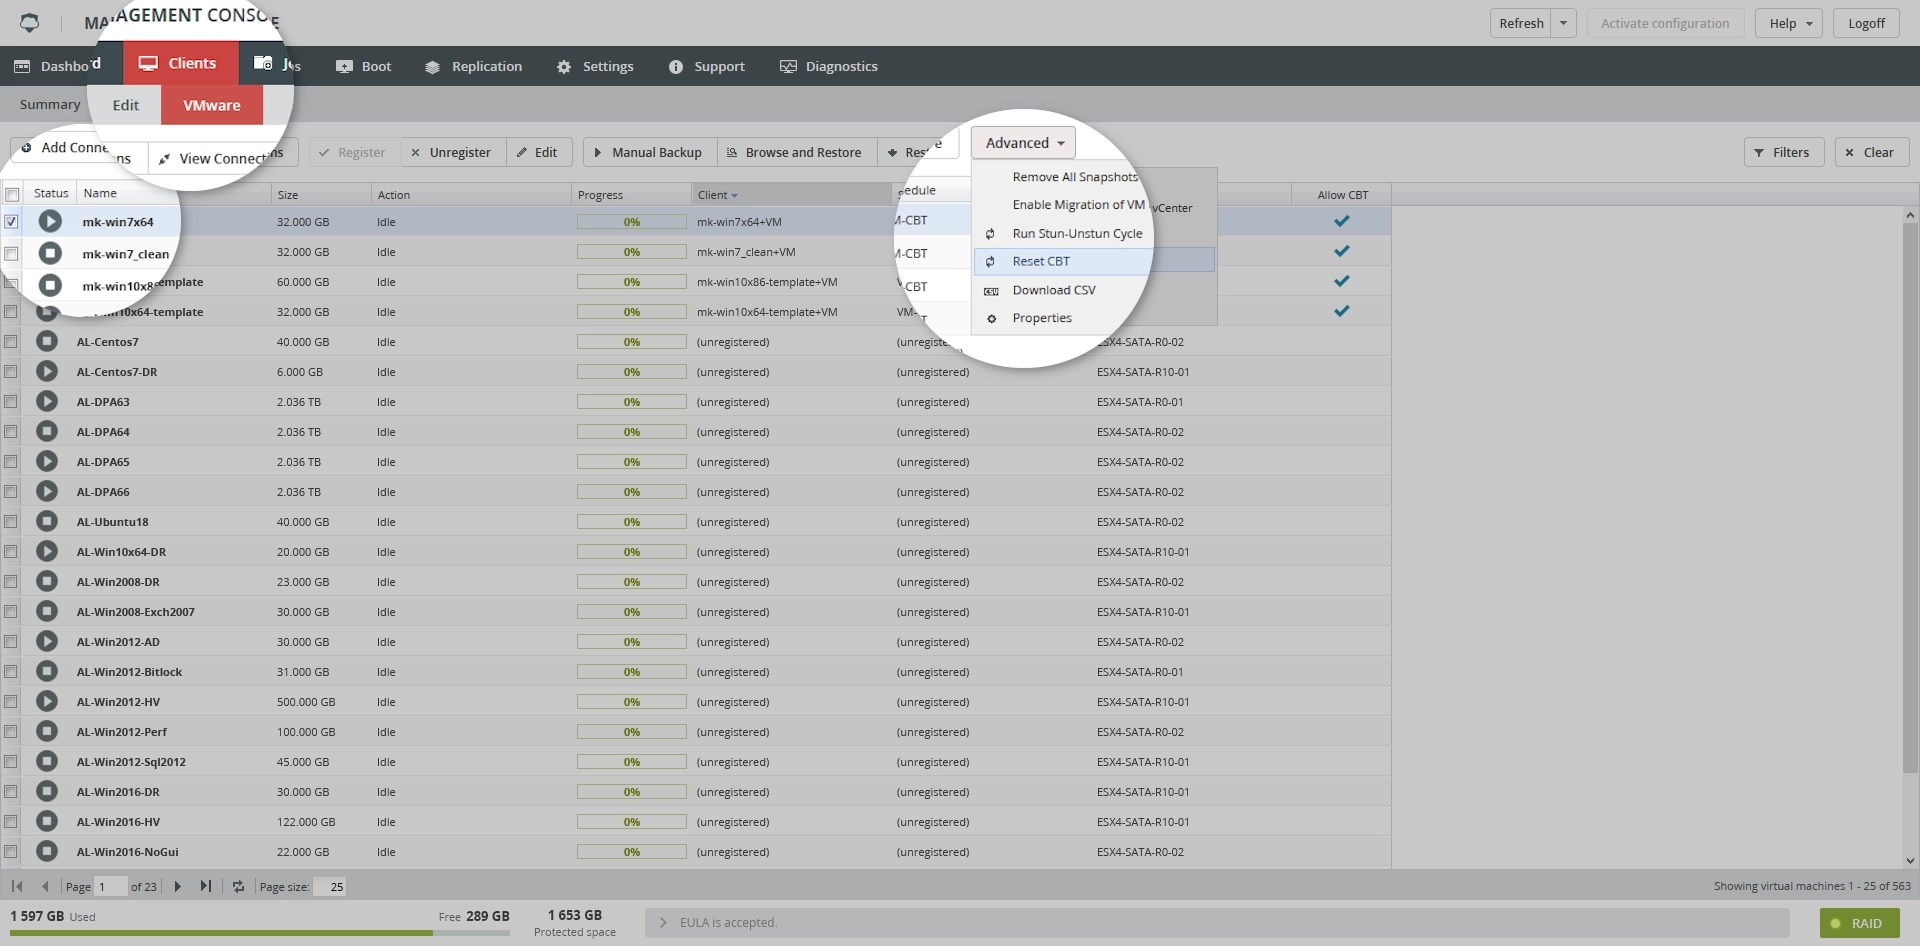
In the Management Console of the Backup & Disaster Recovery appliance, go to Clients › VMware.
Select a VM you want to reset CBT for.
CBT can be reset only for those VMs that are registered, powered on, do not have snapshots, and have CBT allowed).
On the toolbar, click Advanced, and then click Reset CBT.
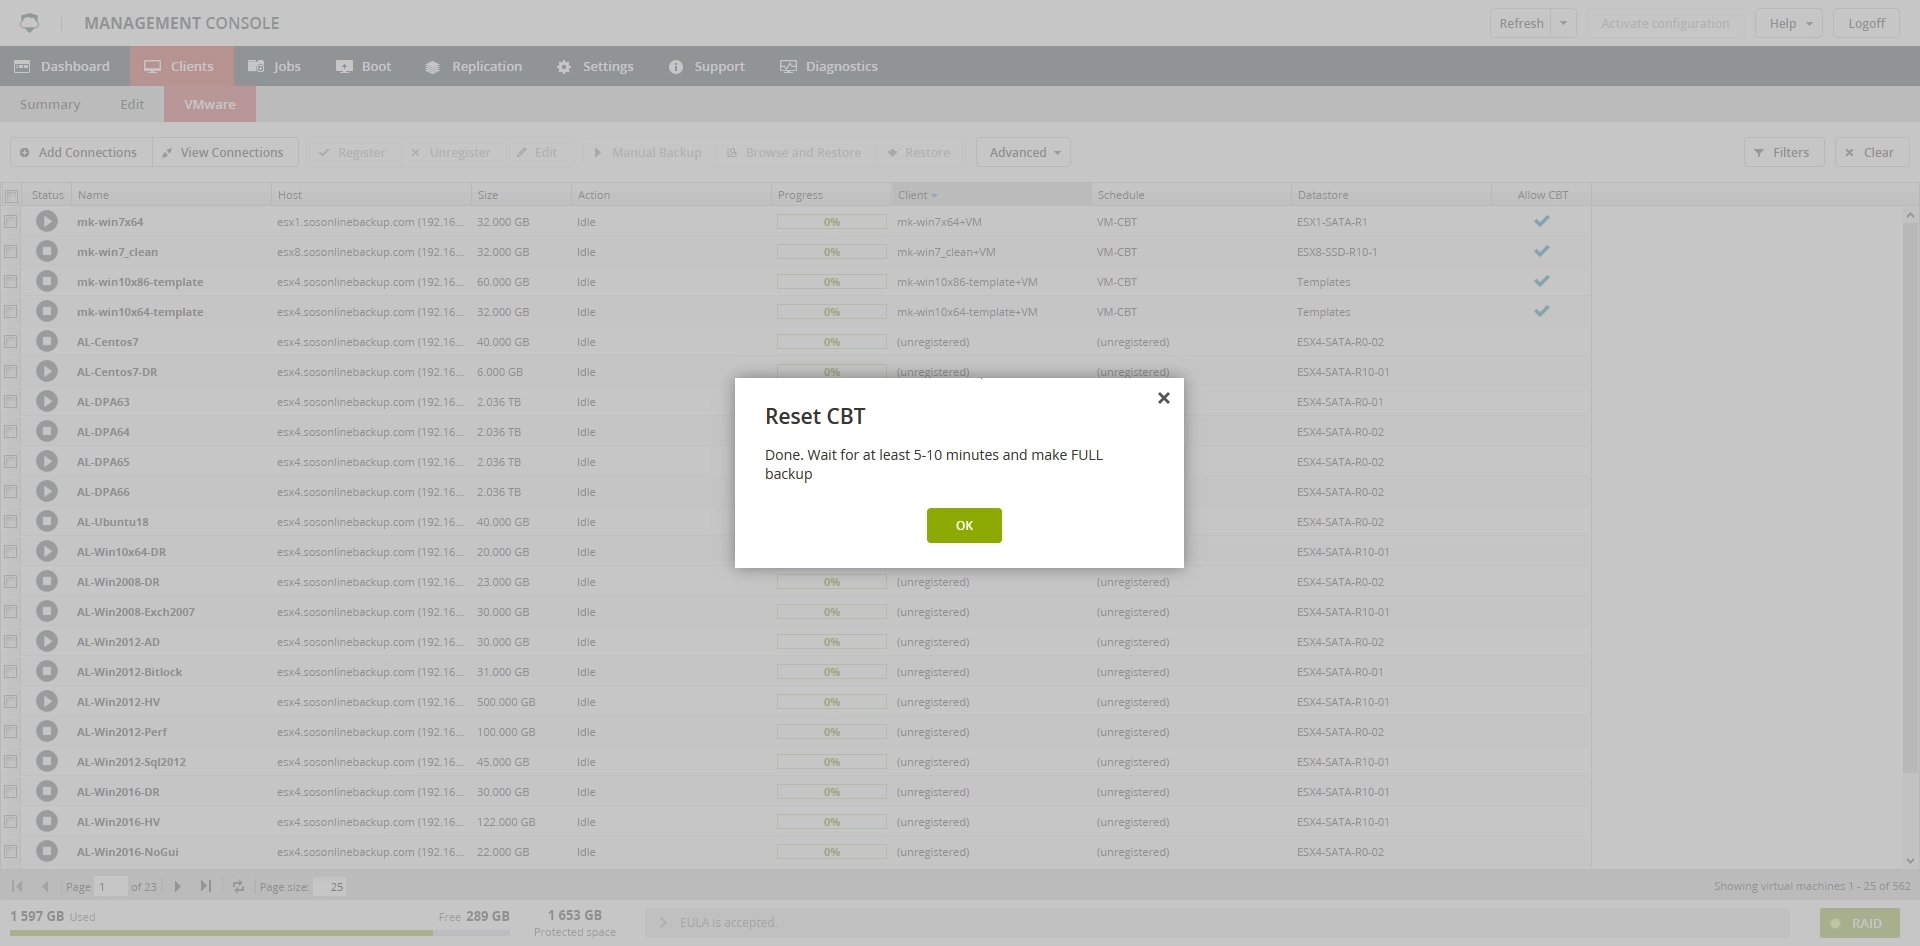
After the system finishes resetting CBT, it will show a dialog box with confirmation.
How to reset password on Backup & Disaster Recovery appliance
If you lost or forgot the password to log in to the appliance Management Console, you can reset it. For this, you must have access to the appliance terminal.
8.7.0 and later
To change or reset the password on the appliance with firmware version 8.7.0 and later:
Restart the appliance.
Wait for the appliance to show the boot loader, and then press any key (except Enter and Return) to interrupt booting.
You have 5 seconds to interrupt before the appliance continues booting. Otherwise, you will have to restart the appliance again.
Select the option that starts with
OS [version], and then press e to edit the commands executed before booting.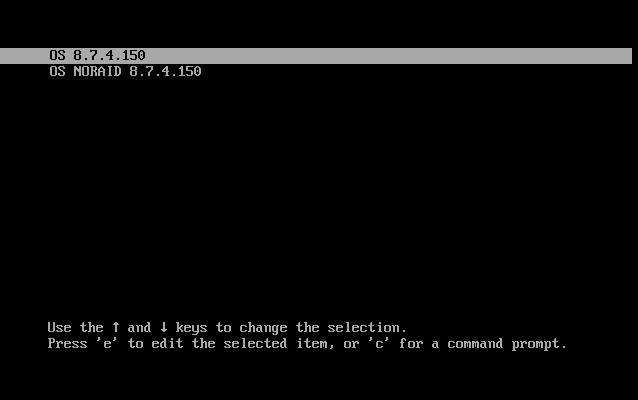
Go to the end of the line that starts with
linux, enterrd.break, and then press Ctrl+X to start booting.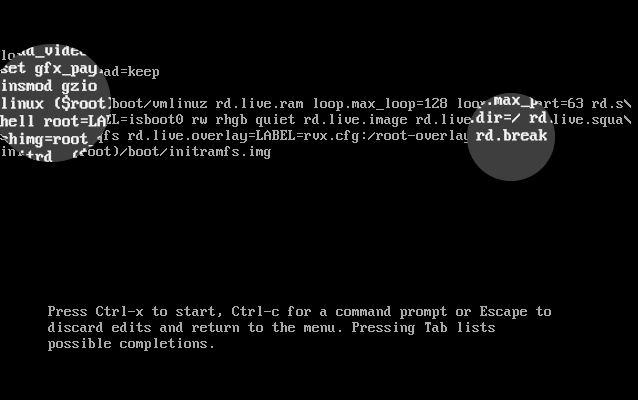
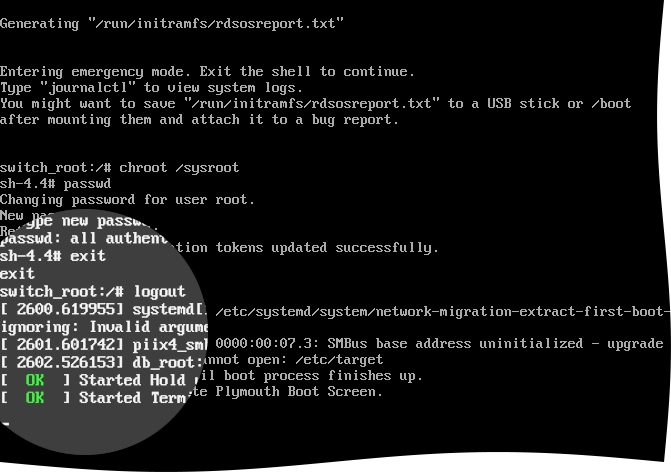
The appliance boots into the shell.
Check the access mode on the
/sysrootmount point.For this, run the following command:
mount | grep sysrootIf
/sysrootis mounted in the read-only mode (seeroin the command output), remount it in the read-write mode.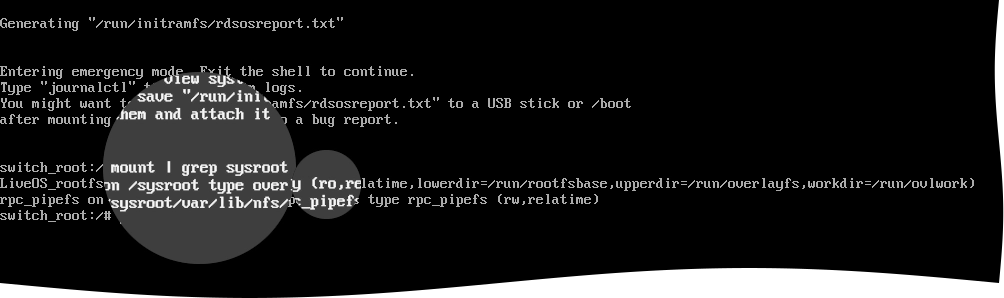
For this, run the following command:
mount -o remount,rw /sysroot/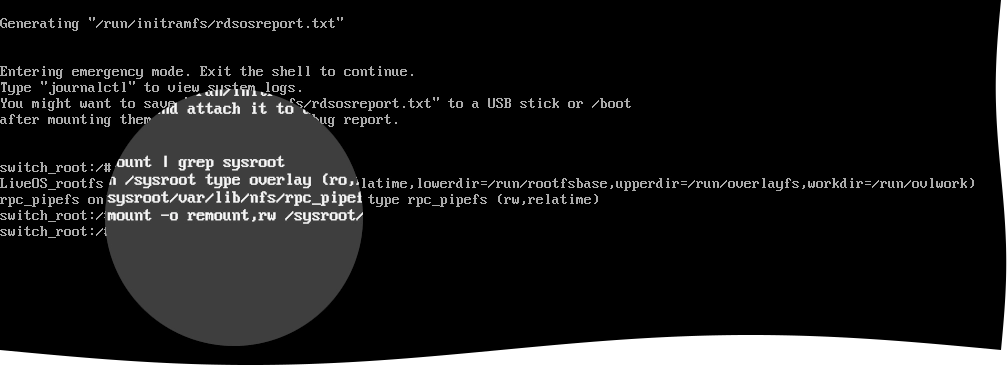
If
/sysrootis mounted in the read-write mode (seerwin the command output), continue with the next step.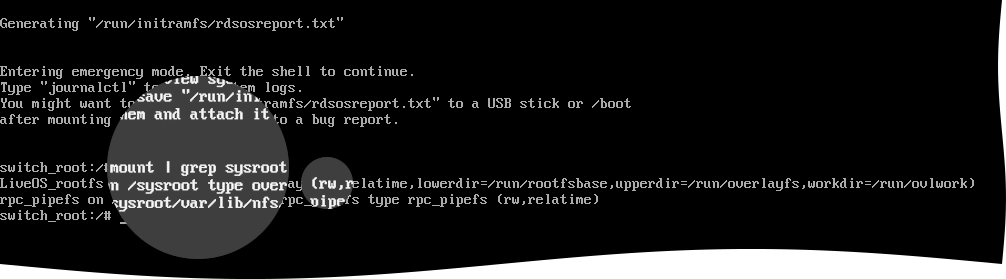
Change the root directory.
For this, run the following command:
chroot /sysroot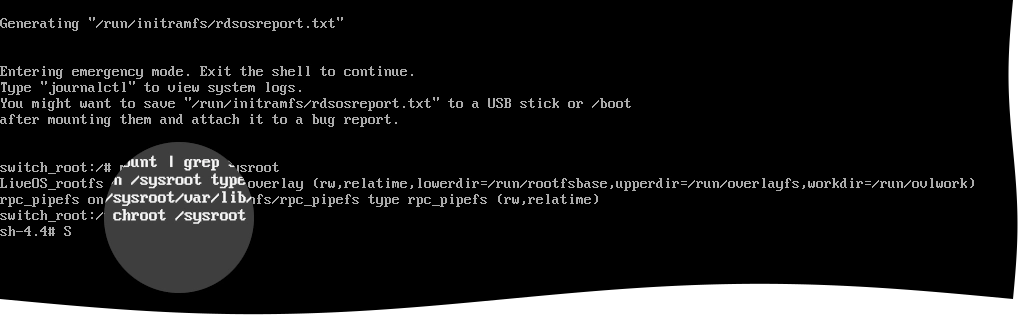
Set the new password.
For this, run the following command, and follow the on-screen instructions to set the password:
passwd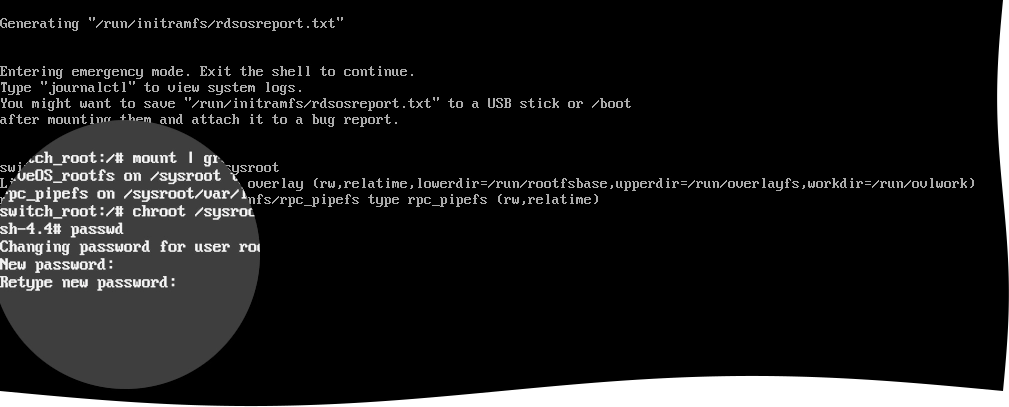
Relabel the file system.
For this, run the following command:
touch ./autorelabel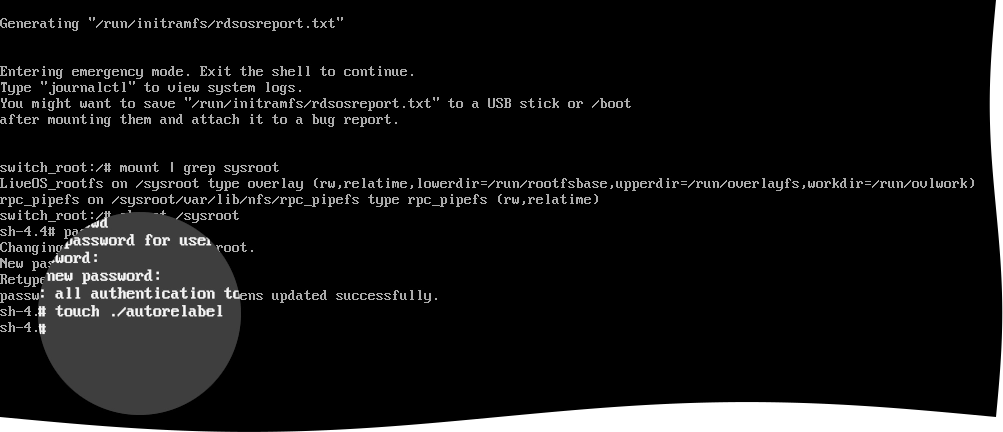
Change the root directory, and then log out to continue with the normal boot.
For this, run the following commands:
exit
logout
Wait until the file system relabeling completes. This might take some time depending on the system performance and the number of files.
The appliance boots normally, and you can log in to the Management Console with the newly set password.
8.6.x and earlier
To change or reset the password on the appliance with firmware version 8.6.1 and earlier:
Restart the appliance.
Wait for the appliance to show the boot loader, and then press any key (except Enter and Return) to interrupt booting.
You have 3 seconds to interrupt before the appliance continues booting. Otherwise, you will have to restart the appliance again.
Select the option that starts with
OS [version] (VGA), and then press e to edit the commands executed before booting.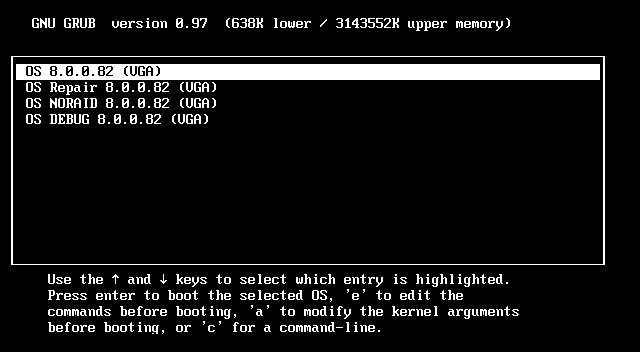
Select the line that starts with
kernel, and then press e.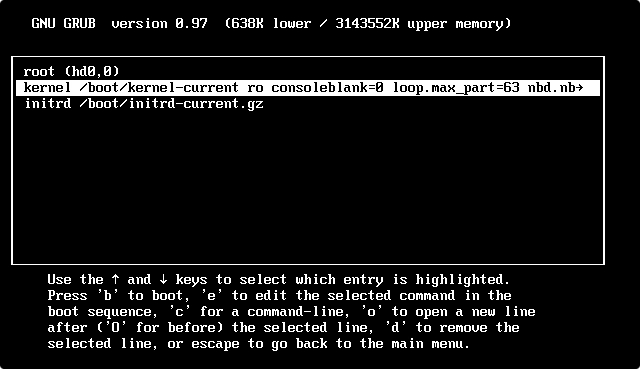
Press Space, enter
1, press Enter, and then press b to start the shell.Set the new password.
For this, run the following command, and follow the on-screen instructions to set the password:
passwd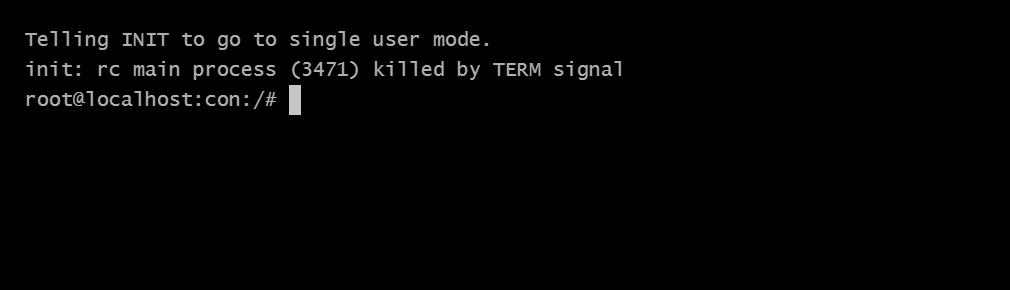
Restart the appliance.
For this, run the following command:
reboot
The appliance restarts, and you can log in to the Management Console with the newly set password.
How to reset networking settings on Backup & Disaster Recovery appliance to default
How to restart backup service on Backup & Disaster Recovery appliance, or disaster recovery backup agent
How to restore Windows registry partially
How to test network speed between Backup & Disaster Recovery appliance and clients
How to update firmware of the Backup & Disaster Recovery appliance
In the Management Console of the Backup & Disaster Recovery appliance, go to the Settings tab.
In the Basic group on the left, click Firmware Update.
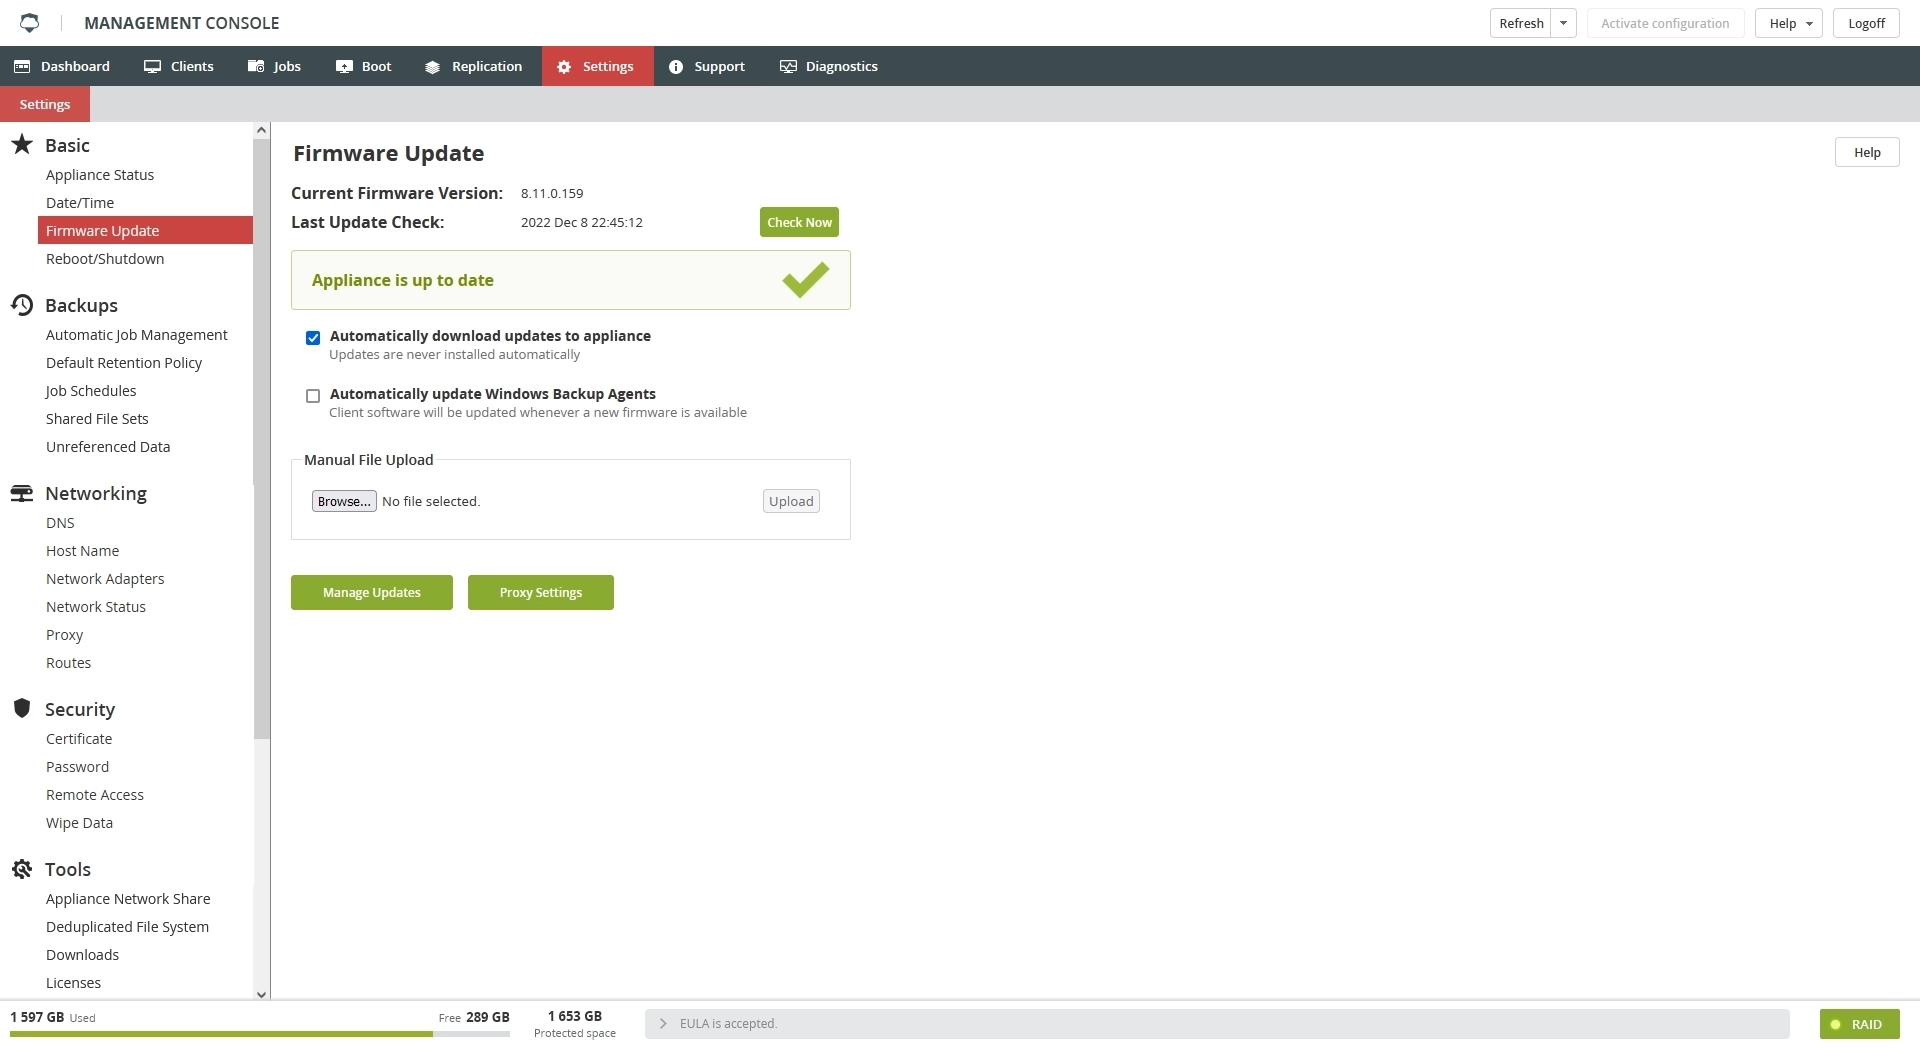
If you have Automatically download updates to appliance selected, click Install to prepare for the update.
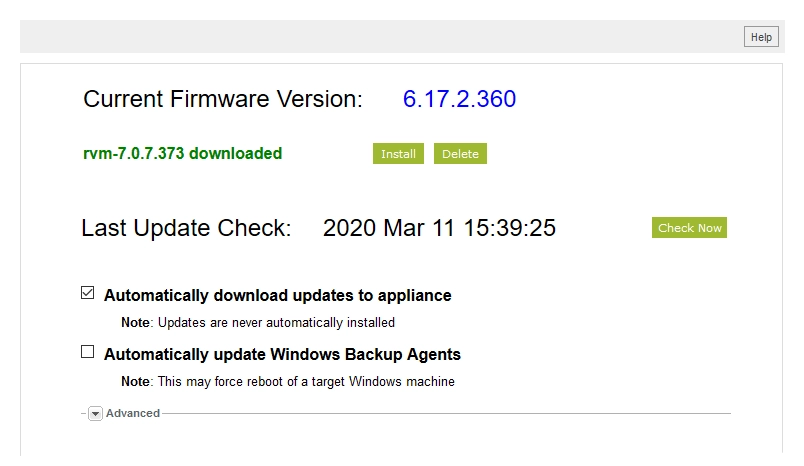
If you have Automatically download updates to appliance cleared, click Download to save the update file to the appliance.
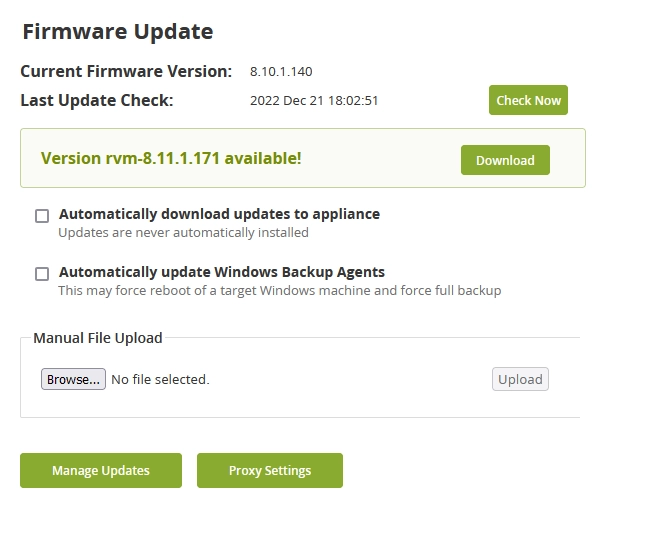
After the download is complete, click Install to prepare for the update.
After the appliance is ready to install the update, click Reboot.
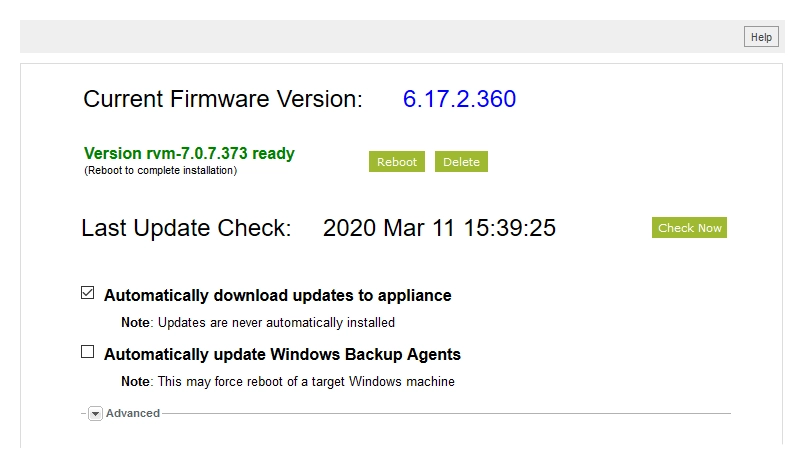
After you update the appliance firmware, we strongly recommend to update the backup agents on the clients associated with the appliance. See Install DR backup agent for details.
How to use both network interface controllers on Backup & Disaster Recovery appliance
How to use UNC paths to back up network shared folders
Backup fails due to database being offline
Backup job hangs or fails due to VSS writer issue on server
Backup job seems to hang or stuck
Cannot find certain files and folders selected for backup using browse and restore
Client does not run scheduled backups
Client status. Backup agent is running but cannot communicate
Client status. Client is down or unreachable
Details
| Status icon | Status label |
|---|---|
| Client is down or unreachable |
This status indicates one of the following immediate issues has emerged:
client is turned off
client is not on the network
firewall is blocking the
bacula-fdserviceconfiguration file is missing
backup agent is not installed
Example
Troubleshooting
To resolve the issues that raised this status, verify and fix (if needed) the following:
Ports 9102 and 9103 are open for the affected client
Check your firewall and antivirus settings. Also, check if other third-party applications use these ports
Services are up and running on the affected client
Open the Run command (press Win+R on the keyboard).
Enter
services.mscto open Windows Services Manager.Check if the following Infrascale services are running (see the Status column).

Client Status Resolution
Error. Authoritative answer for host not found
Error. DR Image Backup Failure: Failed to create SuperAgent remote proxy
Error message
Message logs in the Management Console of the Backup & Disaster Recovery appliance show the following DR image backup error:
DR Image Backup Failure: Failed to create SuperAgent remote proxy Error description
The error refers to miscommunication between the backup agent installed on the client and the associated appliance.
It can show after updating the backup agent, that is when the previous backup service had not stop before the new one started.
Steps to resolve
If the error relates to a VM client, perform the steps for the associated host.
Uninstall backup agent and install it again
Stop all related Infrascale services running on the client:
Infrascale Backup and Restore Agent (64-bit)
Infrascale Installation Client
Infrascale Remote Management
If a service got stuck in the Stopping state, this indicates possible issues with the operating system. Restart the client and try stopping the service again.
Uninstall all related Infrascale software from the client.
Make sure the following folders were deleted, or delete them manually:
C:Program FilesInfrascaleC:Program FilesRVX-BackupC:Program Files (x86)InfrascaleC:Program Files (x86)RVX-Backup
Download the backup agent installer from the appliance Management Console › Settings › Tools › Downloads.
Run the installer and follow the on-screen instructions to install the latest version of the backup agent.
Restart the client, and then check if all related Infrascale services you stopped earlier are running again on the client.
Change client operating system
In the appliance Management Console, go to Clients › Edit.
Select the client with the error.
In the General group, change the operating system to any other.
Click Apply to save changes, and then click Activate Configuration on the upper right.

Change the operating system back again.
Click Apply, and then click Activate Configuration again.
Error. Cannot connect to explicitly configured server instance
Error. Cannot get configuration for backup of database
Error. Could not connect to storage daemon
Error. Could not start. The system cannot find the file specified
Error. An existing connection was forcibly closed by the remote host
Error. Failure getting log and patch files
Error. A file access error occurred on the host or guest operating system
Error. Filesystem change prohibited
Error. GetConfiguration timed out
Error. Memory allocation failed. Out of memory
Error. The method is disabled
Error. Failure getting log and patch files
Error. Network error on data channel. Connection reset by peer
Error. Source and destination disk size does not match
Symptoms
All backups, including full, of a VMware virtual machine (VM) fail with the following error message:
Source and destination disk size doesn't match Cause
VM hard disk (VMDK) is not properly aligned meaning that its size is not multiple of 1 kB (or the disk has an odd number of sectors). Thus, the disk size reported by two different VMware API calls is different.
VMware UI does not allow you to create a disk with size not multiple of 1 kB, but a disk that was not created in the UI can easily be like this. For example, if:
Hard disk was created from the command line
VM was imported from OVA
VM was converted from another hypervisor
VM was created as part of converting a physical machine (P2V)
Resolution
Resize the disk to be an even number of sectors. The easy way to do this is to increase the disk size.
In vSphere Client, find the respective VM.
Right-click the VM, and then click Edit Settings in the context menu.
The Edit Settings dialog opens.
On the Virtual Hardware tab, check sizes of VM hard disks.
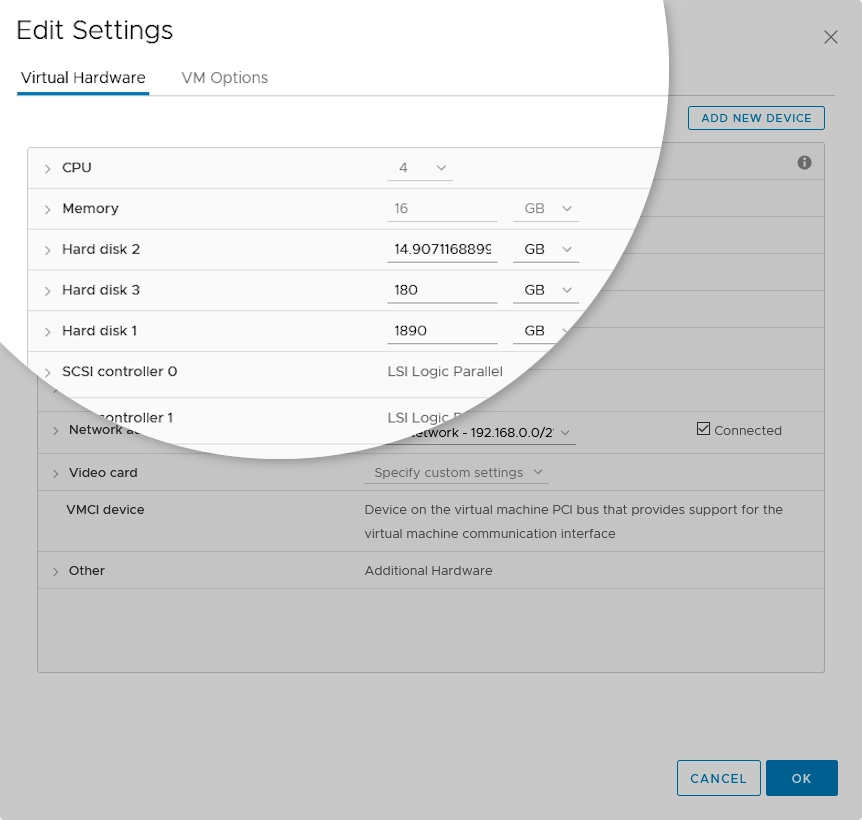
If size of any disk is not a whole number (
14.9071168899in the example screenshot), change it to the nearest integer (for example,15).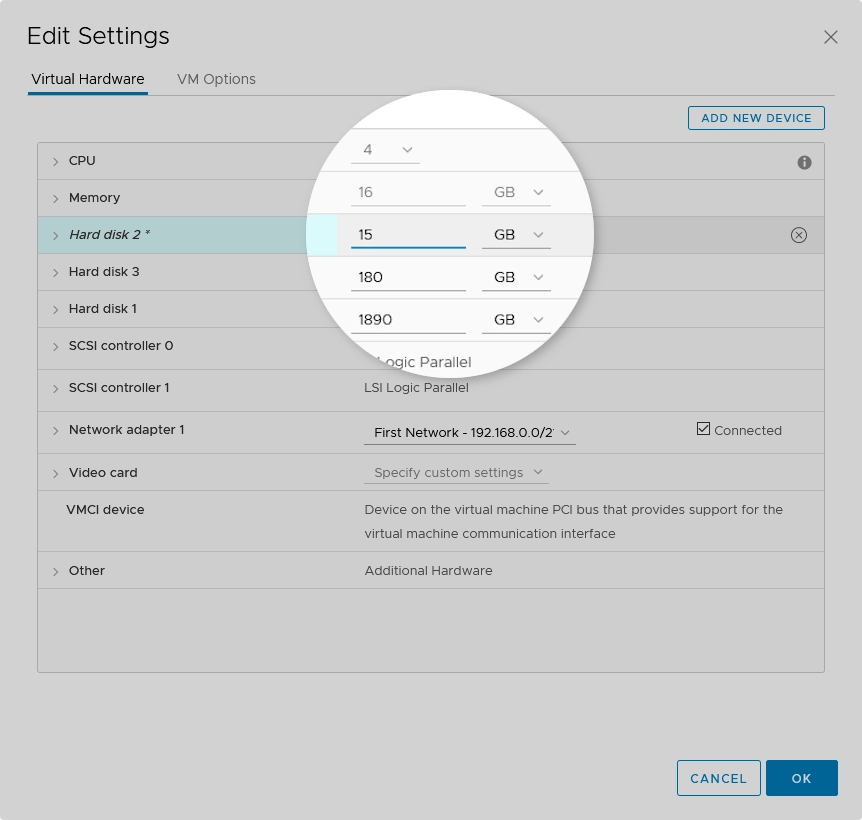
Sometimes, this error may occur even if a VM disk size is already an integer. In this case, increase the disk size to the next integer.
Error. The specified network name is no longer available
Error. Specified network password is not correct
Error. Unable to connect to storage daemon
Error. VixEDISKOUTOFRANGE
Error. VixEHOSTNETWORKCONNREFUSED
Error. VSS Snapshot Creation Failed
Error. VSS Writer NTDS is in FailedAtPostSnapshot state
Error message
Message logs in the Management Console of the Backup & Disaster Recovery appliance show the following error:
DR Image Backup Engine Error:
- VSS Writer NTDS is in FailedAtPostSnapshot state, Writer Failure Code=[WriterErrorNonRetryable]
Error description
This error appears if using any other backup or DR solution along with Infrascale software on the same computer.
Some vendors install their custom VSS providers. Windows then uses these providers by default, and also forces the standard DR engine to use them. This results in the backup failures, and may result in data consistency issues even in successful backups.
Steps to resolve
Check if Windows uses a third-party VSS provider by default:
Open Command Prompt as administrator.
In the Command Prompt window, run the following command:
vssadmin list providersThis will list the VSS providers available to and used in Windows. For example:

Check for a third-party VSS provider on the list.
In the example screenshot, it is StorageCraft Volume Snapshot Software Provider. Windows forces the standard DR engine to use this VSS provider by default, and thus the backup jobs fail.
To resolve the issue:
Uninstall any other backup software from the affected computer, restart the computer, and then check if the problematic VSS provider was removed successfully.
Another option, while not recommended, is to use the legacy DR engine instead of the Standard one.
Using Infrascale software along with any other backup solutions may cause unexpected backup failures or data consistency issues even in successful backups.
Error. Error occurred while running the necessary scripts to complete restore
Restored VMware VM boot fails with blue screen errors
Warning. Duplicate VMware connections have been eliminated
Warning message
Duplicate VMware connections have been eliminated. Review your connections. 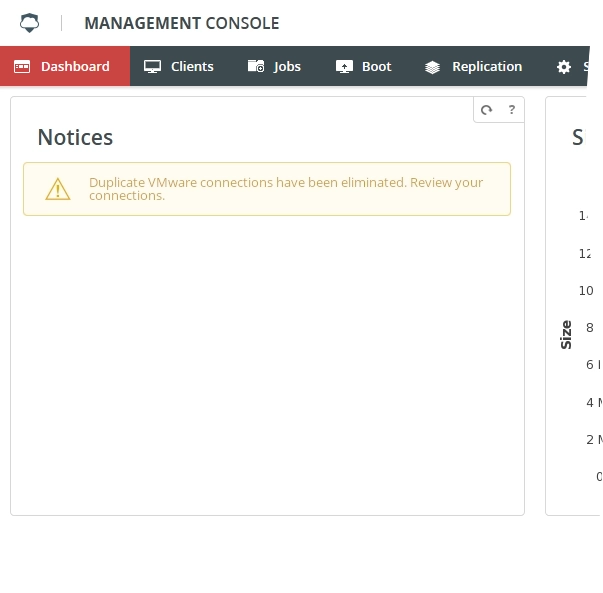
Example warning message in the Management Console
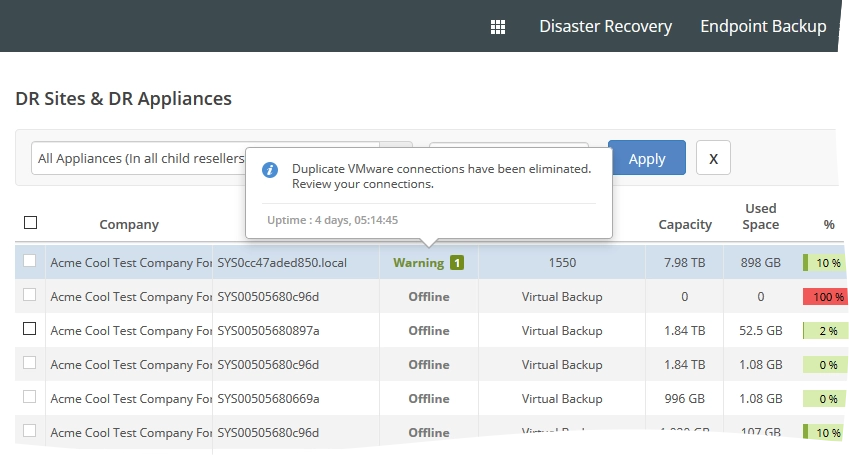
Example warning message in the Dashboard
Warning description
The VMware host sends a command to the Backup & Disaster Recovery appliance, and appliance interprets the command as a duplicate connection from the same VMware host.
To prevent any complications for the backup sets, their schedules and data consistency, appliance automatically removes all artifacts related to the connection, and shows the respective message.
Steps to resolve
In the appliance Management Console, go to Clients › VMware.
Check for the duplicate connections from the same VMware host.
Check for the duplicate virtual machines and the respective clients.
On the Dashboard tab, click the warning in the Notices widget.
The system will immediately clear the warning from appliance, and also from the Infrascale Dashboard in five minutes.
Warning. The scripts required to complete the restore did not successfully run
Warning. The appliance is unable to connect and send monitoring data to the Dashboard
Warning message
Message logs in the Management Console of the Backup & Disaster Recovery appliance show the following error:
The appliance is unable to connect and send monitoring data to the Dashboard.
Click here for more information on possible causes and solutions. 
Warning description
Appliance shows this warning if:
someone changed the account credentials (username or password) used to register appliance in the Infrascale Dashboard; or
the account, under which appliance was registered in the Infrascale Dashboard, was deactivated (canceled or suspended); or
the trial period for the account, under which appliance was registered in the Infrascale Dashboard, ended; or
the account, under which appliance was registered in the Infrascale Dashboard, was locked because of the security reasons; or
the firewall blocks the ports that appliance uses to communicate with the Infrascale Dashboard.