
How to add another computer to the backup?
Outlook OST file restores as 0 bytes
Error. The selected task no longer exists
Error. File is encrypted or is not a database
Backup report. Total data transferred is 0 bytes
Behavior demonstrated at the backup report is caused by deduplication mechanism integrated in OBRM.
If a file with the same content was already backed up, the additional path to the file will be created in the cloud instead of redundant upload.
Cause: The files with the same hash located in different folders are included in the backup set.
File names can differ, but the content is identical.
At the same time, the Dashboard indicates cloud used space instead of transferred data.
Cloud used space increases in both cases, deduplication or upload.
During the deduplication, the files’ data is not transferred to the server.
Hence, the Dashboard shows the Uploaded files size value other than 0 bytes.
| Backup event details | Backup report |
|---|---|
 | 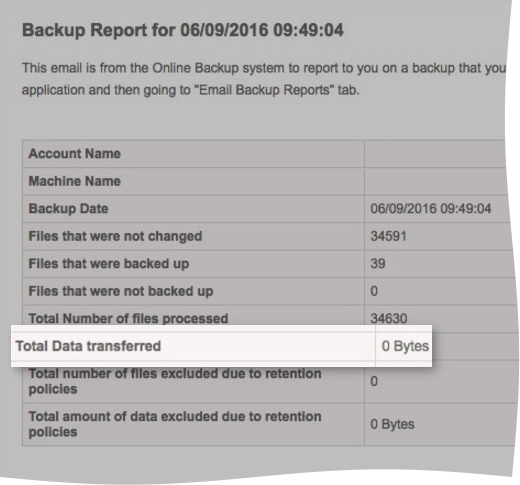 |
The indicator “Total Data Transferred” shows the amount of data that was actually transferred to the server after its compression/encryption.
For example, create a text file with 100 MB of not random data, but some symbols, that is 11111..., and back it up.
Monitoring will show the actual file size transferred to the cloud (100 MB), but the backup report—“Total Data Transferred” will show hundreds of kilobytes (after the encryption).
Error. Account over quota
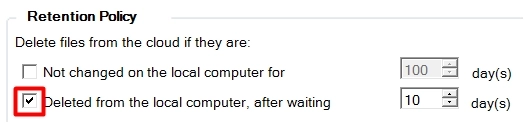
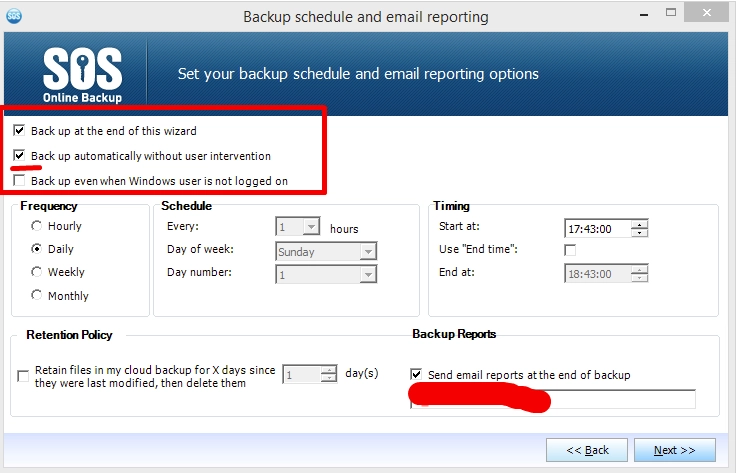
To prevent such an overage occurring again, we recommend using a retention policy. This will help keep the local data and the cloud data in line with one another while still proving a grace period (X days), just if something is accidentally deleted.
The Retention Policy options can be found at the last portion of the backup configuration:
Error. System.OutOfMemoryException
Error message
Exception of type 'System.OutOfMemoryException' 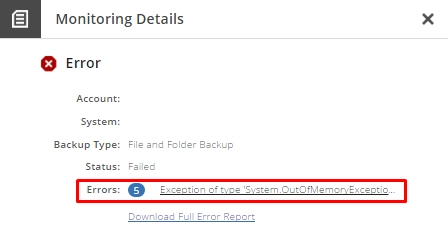
Error description
System.OutOfMemoryException error means that the OBRM SAgent service consumed all the allocated memory.
The following factors cause this error:
too large backup set
limitation of memory usage on the 32-bit operating systems
Steps to resolve
Check the amount of the used memory on the affected device as follows:
Press Win+R to open the Run dialog.
Enter
resmonin the Open box, and then press Enter.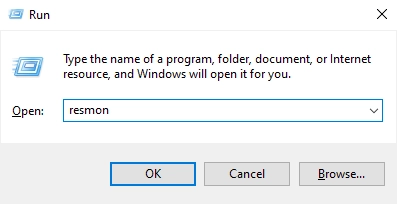
In Resource Monitor, go to the Memory tab, and find the
SAgent.Service.exeprocess.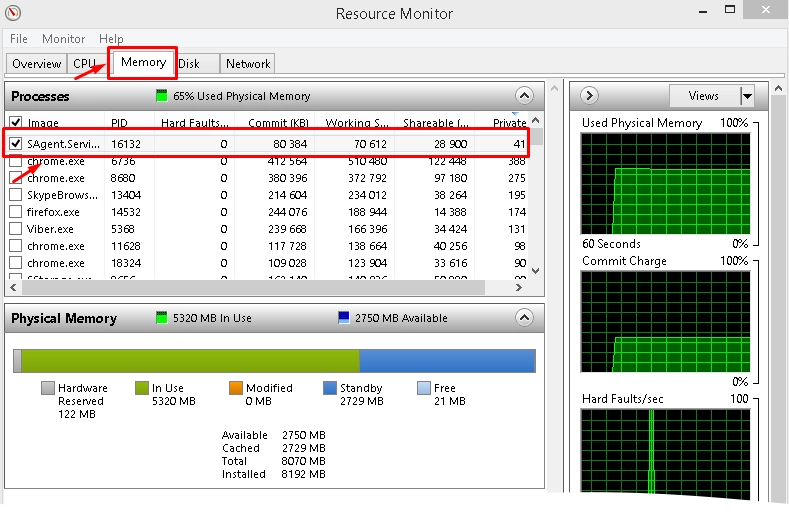
Note the amount of memory used by the process.
Update OBRM to the latest version, and then contact Infrascale Support.
Error. Failed with packet size. Check your internet connection
Error message
Failed with packet size... check your internet connection Steps to solve
To fix this error, check if SSL is enabled in Online Backup and Recovery Manager (OBRM):
In OBRM, click Menu, and then click Advanced Options.
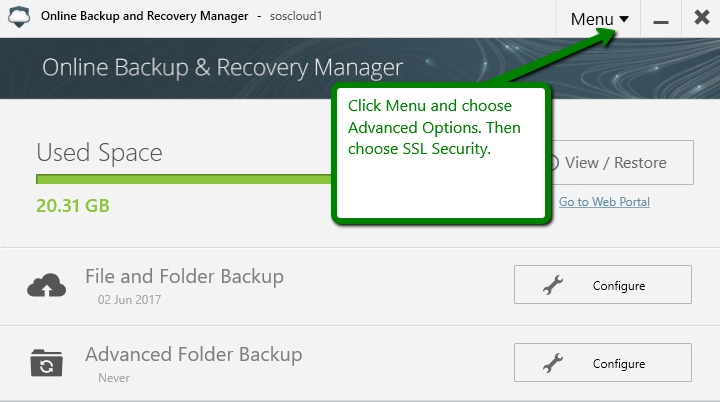
Click Security Options, and then select SSL Enabled.

Also, there is a chance that you have some type of firewall blocking the backup service from accessing your files.
Error. Cannot create a file when that file already exists
Error message
Cannot create a file when that file already exists. (Exception from HRESULT: 0x800700B7)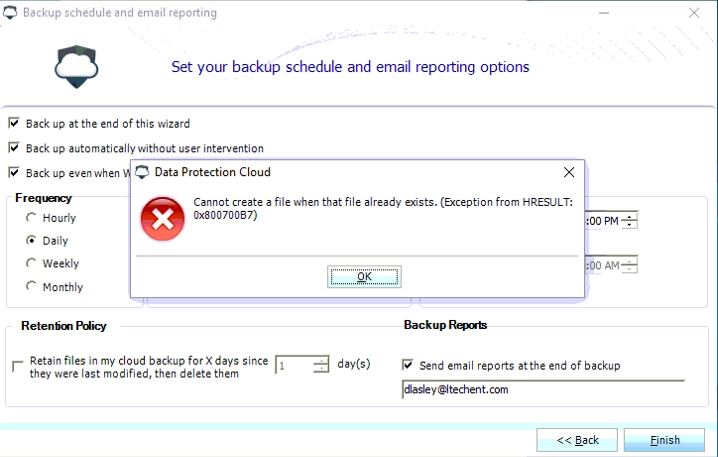
Error description
This may be caused by Windows Task Scheduler task for the current backup account username.
The task has been incorrectly cached in the operating system. Because of this, it may or may not exist in the Task Scheduler tasks. In this case, you would be unable to complete the backup wizard.
Steps to resolve
To fix the issue for the affected username, you need to clean the Task Scheduler cache and fix the transaction log via the following steps:
Check the OBRM task if that task is for problematic backup account via Taskschd.msc. Remove it if exist.
Firstly, export and after that remove the following key using Registry Editor:
%HKEY_LOCAL_MACHINESOFTWAREMicrosoftWindowsNTCurrentVersionScheduleTaskCacheTreeOnline Backup and Recovery Manager%Open Command Prompt, and enter the following command:
fsutil resource setautoreset true c:(See details.)
Restart the computer.
Create the backup set again using the problematic user credentials and check the result.
If the issue persists:
First time, complete the Backup Wizard without the Back up automatically without user intervention option.
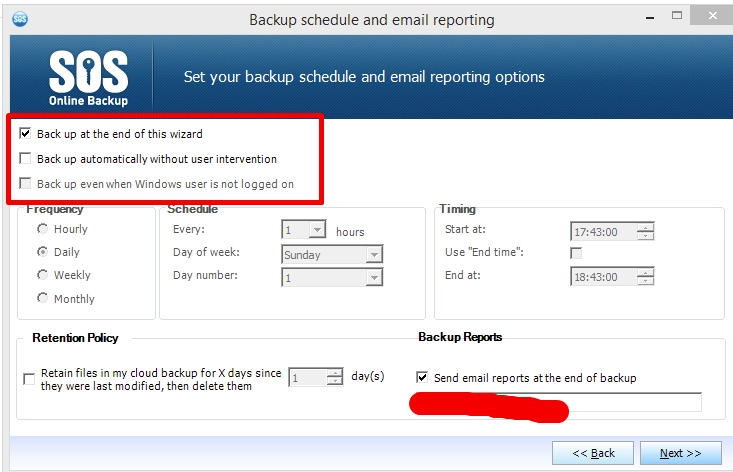
Second time, complete the Backup Wizard with Back up automatically without user intervention option.
Error. Custom Online Backup and Recovery Manager MSI failed to create a new backup account or to register the device
Summary
Sometimes backup accounts are not created, hence, machines are not registered in the Dashboard after installing or deploying a custom MSI.
What to do if account is not created
Make sure that, after the MSI installation, Windows user was logged out and logged on to the operating system, or the machine was rebooted.
Logging out from Windows and then logging in (or reboot) is needed for a backup account to be created after MSI installation. This works in such manner because Custom MSI functionality was developed for using GPO deployment, and thecommand
GPUPDATE /FORCErequires a reboot.Check if the log file
AccountCreatorRunner_vX.X.X.logexists inC:ProgramDataOnline Backup and Recovery ManagerLogs.If so, submit the file to Infrascale Support or identify the reason why account failed to be created (explanations are provided below).
Typical causes of errors during account creation
Default User Quota set during configuration of MSI parameters exceeds the amount of unallocated space available for the CompanyPartnerDistributor under which the MSI is created.
The screenshot shows correct settings when the quota for a new account is set as 50 GB and that is below the Remaining space—142 GB:
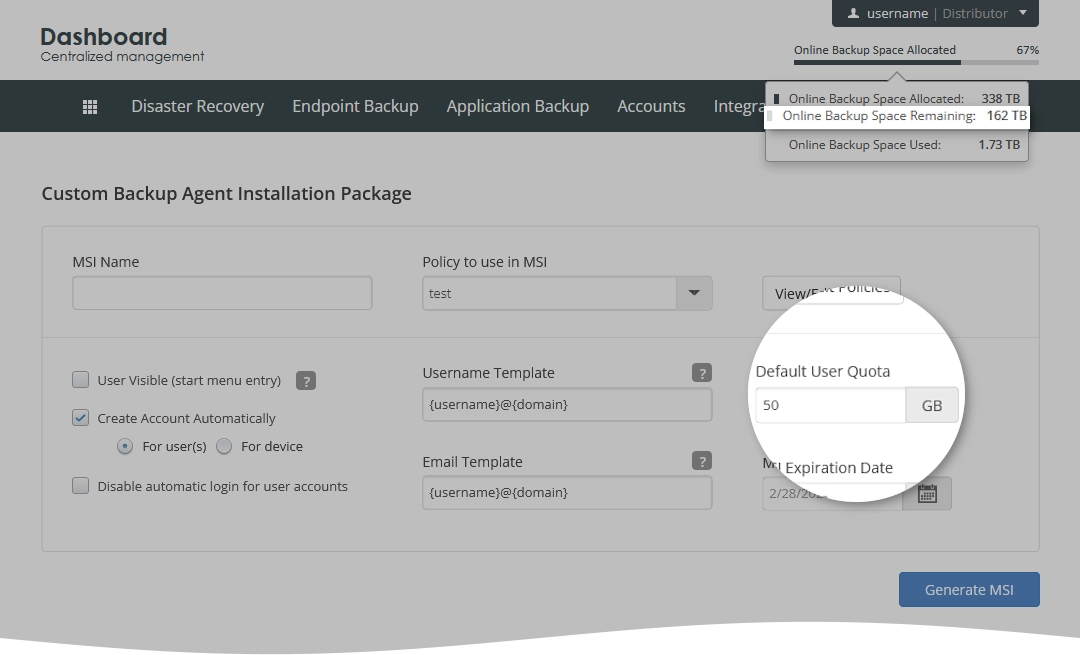
As MSI is valid by default during 1 month, the situation may happen that MSI is installed 20 days after it is created. By that time, the CompanyPartnerDistributor may have all cloud space allocated so the account will not be created. That is why it is advised to deploy it hereafter the generation.
The error in
AccountCreatorRunner_vX.X.X.logis following:ERROR AccountCreator - Attempt to set Entity quota what does not belong to allowed range.The suggestion is to generate a new MSI with the correct User Quota or increase the Quota for the CompanyPartnerDistributor.
A new backup account username that is generated according to the configured template matches a backup account username existing in our systems.
The default template is
{username}@{domain}.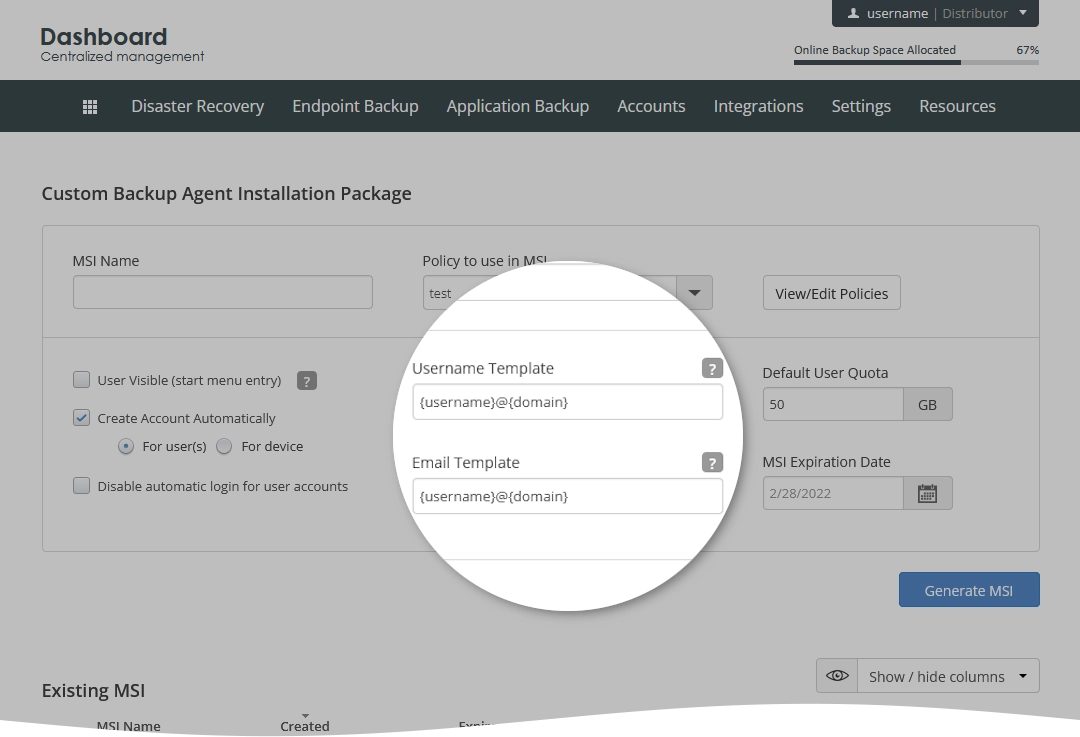
{username}—will be the Windows user under which MSI is installed.{domain}—for the machines not connected to a domain, this will look likePC-NAME.local</code>; so at the each machine the username will be different: John@PC-NAME.local, Sarah@laptop.localFor machines in a domain, the
{domain}will look likemycompany.localormycompany.com. If it is installed via GPO, every machine will be registered in the Dashboard under the same username, for example,DomainAdminUser@mycompany.localIt is not required to use exactly
{username}@{domain}in the template. The username and email may be literals, that is you can enterjohn-smithandjohn.smith@mycompany.comto the indicated fields so that a number of machines, where MSI is installed, will be registered under the same backup accounts (more than five machines is not advisable due to longer time for refreshing local databases).Or the username and email may contain both template parts and literals, that is
{username}.PartnerName,{username}.EngineeringDep,{username}@{domain}-myorganization.Backup account usernames are unique across Cloud Backup. If the current Windows username is “User”, or “Admin”, or something like that, there is a very high possibility that such username already exists in Cloud Backup. Hence, the backup account will not be created, and
AccountCreatorRunner_vX.X.X.logwill contain the following error:ERROR AccountCreator - Password cannot be emptyIt does not mean directly that the password is empty. But it points to the fact that there is an account with the same username under another entity (Company/Partner/Distributor), so the system finds the account, but cannot retrieve its credentials to use them for logging into OBRM installed with MSI.
The suggestion is to enter/add a unique name for Username Template.
Error. Writer is in faulty state
Error. Application has failed to start because its side-by-side configuration is incorrect
Error message
The application has failed to start because its side-by-side configuration is incorrect. Please see the application event log or use the command-line `sxstrace.exe` tool for more detail. 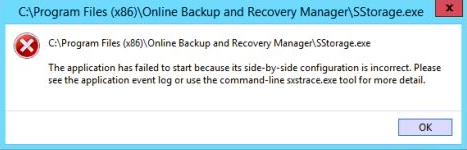
Steps to resolve
Open Control Panel, and go to Programs and Features.
Find OBRM, right-click it, and click Repair.

After the repair finished, start OBRM.
Error. Missing installation package for Online Backup and Recovery Manager
Error message
The file 'pathtoandnameoffile' is not a valid installation package for the product 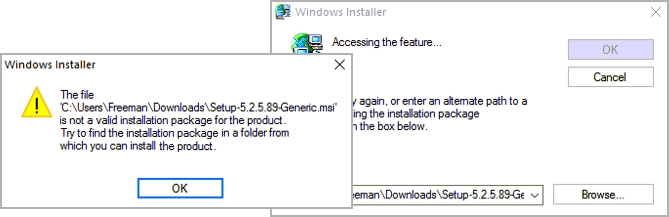
Error description
Occasionally, Windows installer requires the installation package for OBRM and, in most cases, the file is missing.
Steps to resolve
Download Program Install and Uninstall troubleshooter, and open it.
Follow the instructions in the troubleshooter to find and fix errors relating to OBRM.
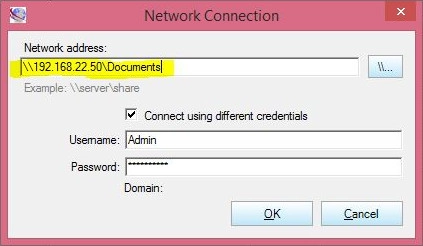
Error. Multiple connections to a server or shared resource by the same user, using more than one username, are not allowed
Error message
Multiple connections to a server or shared resource by the same user, using more than one username, are not allowed.
Disconnect all previous connections to the server or shared resource and try again
Error description
This issue is caused by a confusion/collision in network mapping by Windows. (See details.)
Steps to resolve
Use IP address instead of UNC path when adding a network location to backup.
To obtain the IP address of a network location:
Run Command Prompt as administrator, and ping a network folder or a network device.
ping Server-SQLUse the retrieved IP address when adding a network location in OBRM.
Remove the mapped connections in Windows Explorer. Add connection to the backup configuration. Re-map to the local machine via Windows Explorer.
Error. Microsoft SQL Server backup fails due to database permission issues
Error message
Backup failed for Server 'SQL_SERVER_INSTANCE_NAME'. Details: System.Data.SqlClient.SqlError: The server principal "NT AUTHORITYSYSTEM" is not able to access the database "DATABASE_NAME" under the current security context. Error description
The error may occur when backing up a Microsoft SQL Server database using OBRM.
Steps to resolve
Open Microsoft SQL Server Management Studio.
Connect to the SQL Server instance
SQL_SERVER_INSTANCE_NAME, where backed up databases run;In Object Explorer, go to Security › Logins.
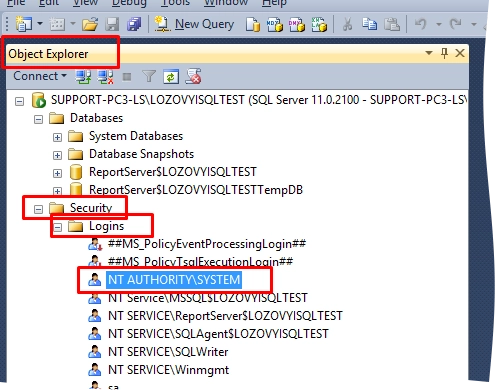
Find
NT AUTHORITYSYSTEM, right-click it, and click Properties.
Go to User Mapping, select the required user database, select
db_backupoperator, and then click OK.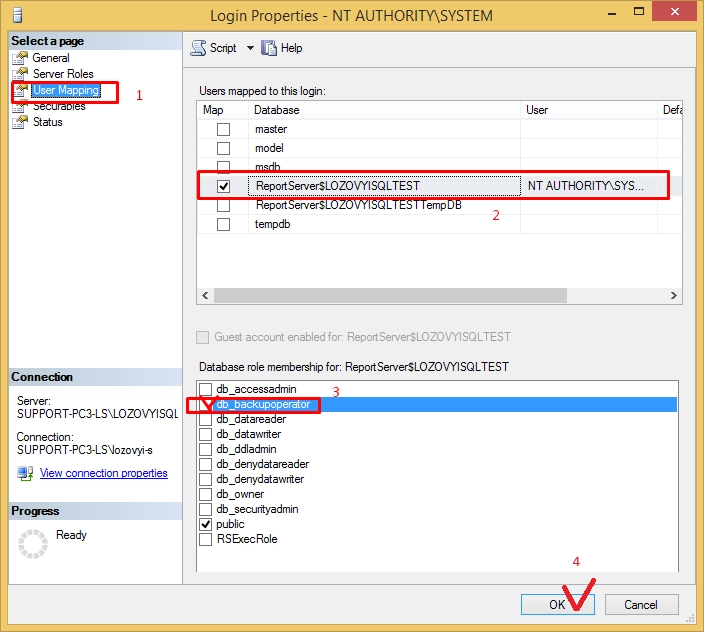
If several databases within the instance should be backed up, find them on the User Mapping page, select and add
db_backupoperatorrole as at the previous step.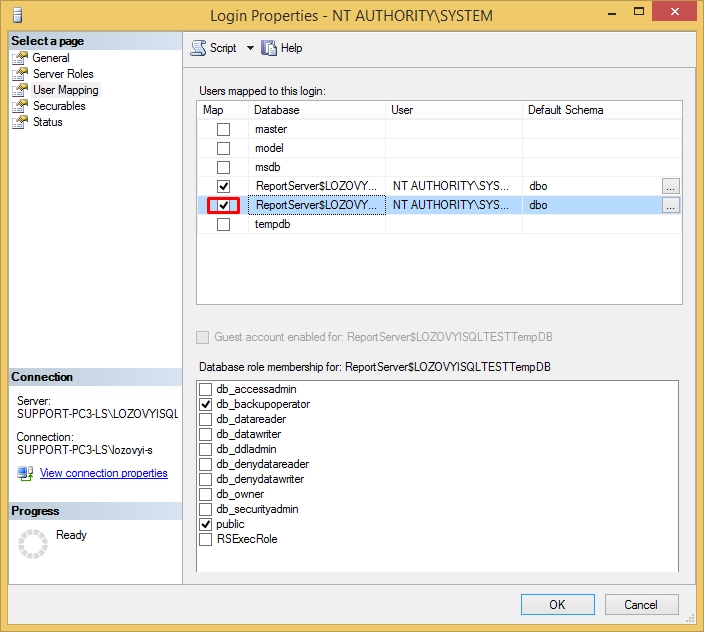
Restart the backup session, and check if it runs without problems for all selected databases.
Error. Online Backup and Recovery Manager does not show Microsoft SQL Server backup option
Check if the SQL Server VSS Writer is presented among other SQL services in Services (
services.msc):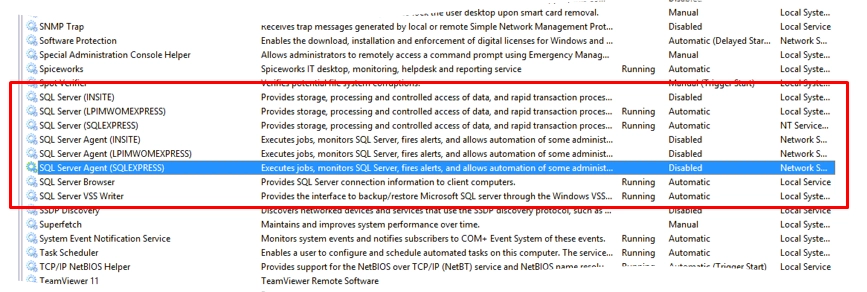
If the SQL Server VSS Writer is not appearing, check following:
Shared Management Objects and Microsoft System CLR Types are installed.
If the above components are installed, try to repair SQL Server installation.
If SQL Server VSS Writer exists, but SQL backup option is not appearing in OBRM, check the state of the VSS writers:
Open the Command Prompt as administrator, and enter the following command:
VSSadmin list writers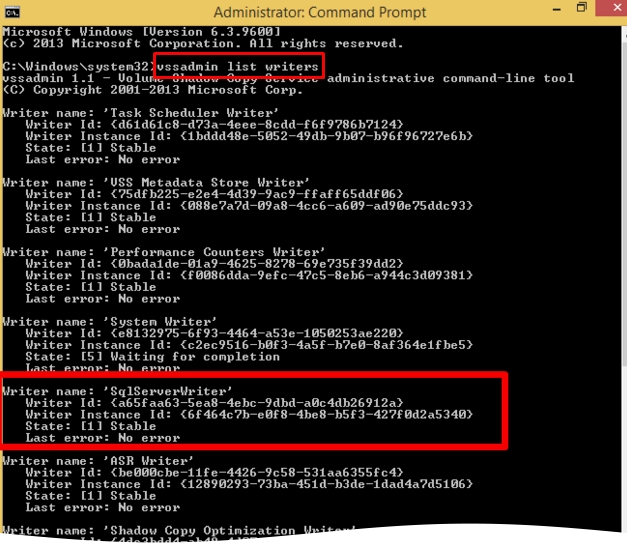
If the SQL Server VSS writer is present, note the output, and then provide it in the support ticket.
If the SQL Server VSS writer is not present on the list, check following:
Change the SQL server VSS Writer service to log in as administrator (domain administrator if the machine is under a domain).
Restart the “SQL Server VSS Writer” service.
Check if another backup software is installed, for example, Symantec Backup Exec 2010 (they may hide, “lock” or rename standard SqlServerWriter).
Submit OBRM logs (Menu › Display logs).
Error. System.Runtime.InteropServices.COMException
Error. Scheduled backups stop working
Error. Specified path, filename, or both are too long
Error. This user cannot sign in because this account is currently disabled
Error. Unable to connect to server
Error. Unable to get size for file
Error. Untrusted root certificate
Event. Backup is not responding
Failure to receive email report after backup
IntelliCache configuration. Skip list of cached file extensions and file sizes in Online Backup and Recovery Manager
Online Backup and Recovery Manager for macOS does not upload backups from network devices to the cloud
Error. Online Backup and Recovery Manager failed to install
Popup notification during installation of Online Backup and Recovery Manager for macOS cannot be opened
What to check if Online Backup and Recovery Manager does not send status events for bare-metal backup jobs?
Summary
This problem may be caused either by Online Backup and Recovery Manager (OBRM) backup service or WMI (Windows Management Instrumentation) problems. Also, the problem may be caused by the precedence of starting these services. WMI service should always start before OBRM backup service.
What to check
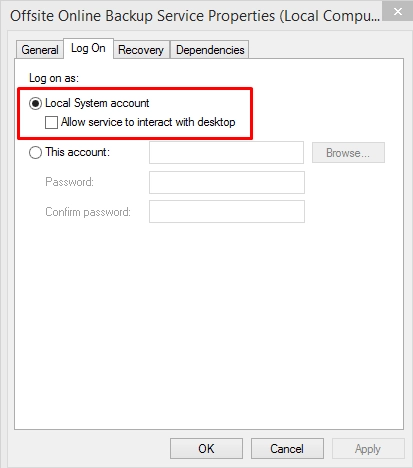
Check if service “Offsite Online Backup Service” (
sagentservice) runs under the proper user credentials.These should be either Local System credentials or credentials of a local administrator.
press Win+R, enter
services.msc, and then click OK.locate “Offsite Online Backup service” and click Properties (or check column “Log On As”)

Check if service “Windows Management Instrumentation” is running (in Services window opened at step 1):

If the service is not running, start it.
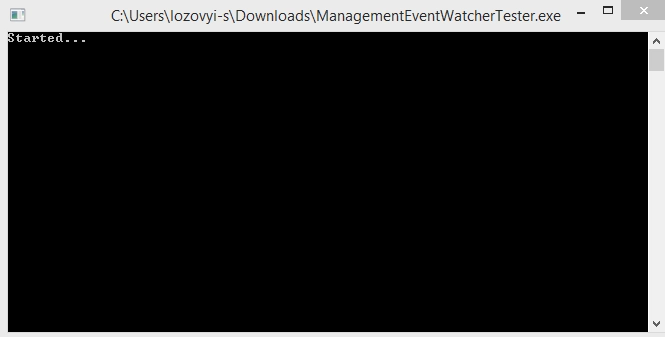
Run the attached tool “ManagementEventWatcherTester” as Administrator to check if the WMI service works without issues.

It will display a command line window with text “Started…”
open Notepad, and the text “processStartEvent_EventArrived” should appear:

close Notepad and the application will show
processStopEvent_EventArrived.
If the application does not show the above messages, there may be problems with WMI service on the machine.
If everything works as described above, the problem may be caused by the precedence of starting these services. WMI service should always start before Offsite Online Backup Service.
To change precedence (set dependency) of the starting services:
Open the Command Prompt as administrator.
Enter
sc config 'sagentservice' depend=winmgmt, and then press Enter.The following message should appear:
sc ChangeServiceConfig SUCCESS.More information is provided here.
Restart the computer, and then check OBRM logs (
SAgent.Service.log) ifSAgentServicedoes not return any errors.
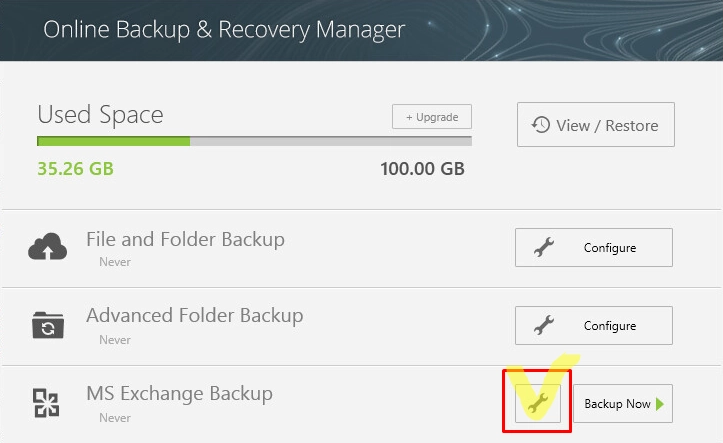
What to check if Online Backup and Recovery Manager fails to connect to Microsoft Exchange server?
Summary
If any errors appear at the fist step of Online Backup and Recovery Manager (OBRM) Exchange backup wizard (after entering Windows credentials to connect to the Exchange server—screenshots are provided below), it is needed to localize the problem: if it is an Exchange server issue or OBRM issue.
Solution
You have to provide a test connection to the Exchange server via PowerShell (from the same machine where OBRM and Exchange is installed):
According to Microsoft knowledge base article:
Open PowerShell (not Exchange PowerShell) and enter the following command:
$UserCredential = Get-CredentialThe window will appear which asks you to enter credentials. Enter them in form of
domainnamelogin, and password that you use to open Exchange Management Console.The user should be “Exchange administrator” and “local administrator” at the Exchange Server.
Enter the following command:
$Session = New-PSSession -ConfigurationName Microsoft.Exchange -ConnectionUri http://<ExchangeMachineFQDN>/powershell?serializationLevel=Full -Authentication Kerberos -AllowRedirection<ExchangeMachineFQDN>is fully qualified domain name of the exchange server, that isemail.mytestcompany.com.If the command #2 ran successfully, enter:
Import-PSSession $SessionAt this step, connection to Exchange Server is established.
Enter the following command:
Get-MailboxThe command will show all mailboxes available in the Exchange database.
End session by entering the following command:
Remove-PSSession $Session
If the same error appears when running the above commands, the issue is caused by the Exchange Server settings or Windows credentials used to connect to the Exchange server.
The next step is to save the error message and search for solutions in Microsoft knowledge base articles.
If the above test completes without errors but OBRM application is still reporting the same error, please, contact Support and provide screenshots of the error for further investigation.
What to do if files backed up by Cloud Backup fail to restore?
Summary
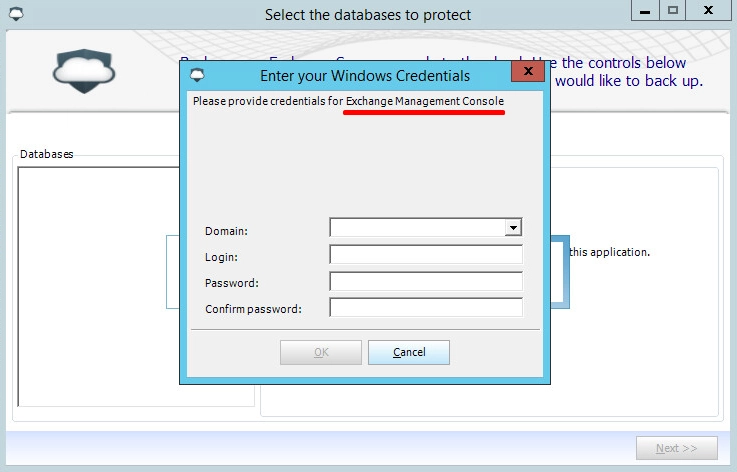
If the recovery progress is showing the errors during the restore of some files, report the issue to Infrascale Support providing the details listed below.
 Example of files failing to restore
What details to submit
Please, provide the following details to Infrascale Support for investigation:
Backup account username used to log in to OBRM.
The cloud device name, from which the files are failing to restore. For example:

Screenshot with the failed files and a text document containing the errors and file paths. For example:
After you send this information, the Infrascale Support will contact you shortly.
Cannot sign in to the Cloud Backup account
You can sign in to both the backup account (from the Backup Accounts view) and the company account (from the Companies view) if you are using your partner credentials:
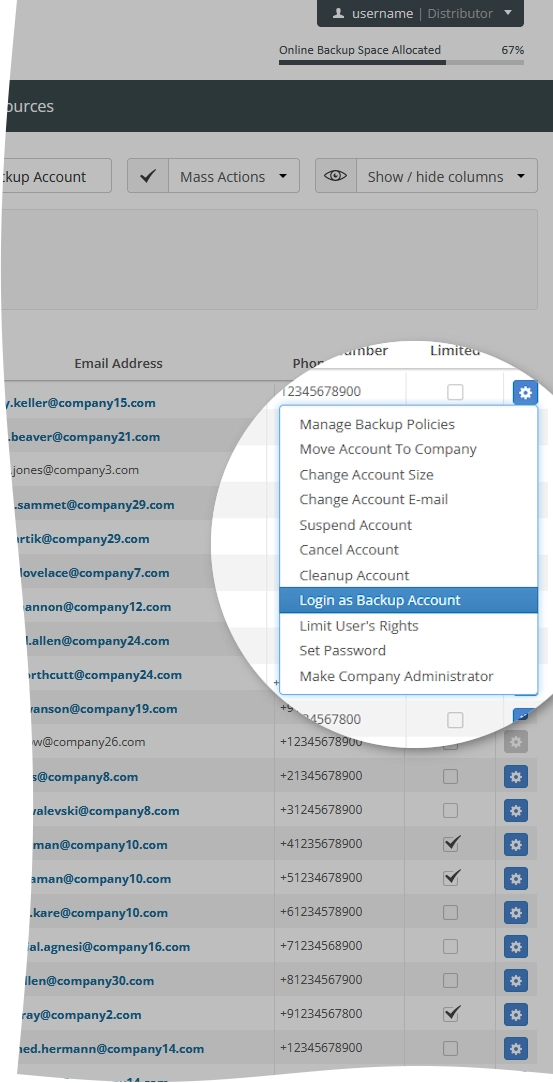
But if you are already logged in as the company account (from the Companies view), then you will be unable to log in as the backup account. It is impossible to use “login as” option recursively.
In this case, you need to click the link Resume session as in the upper part, and then the option to log in as the backup account will be available:
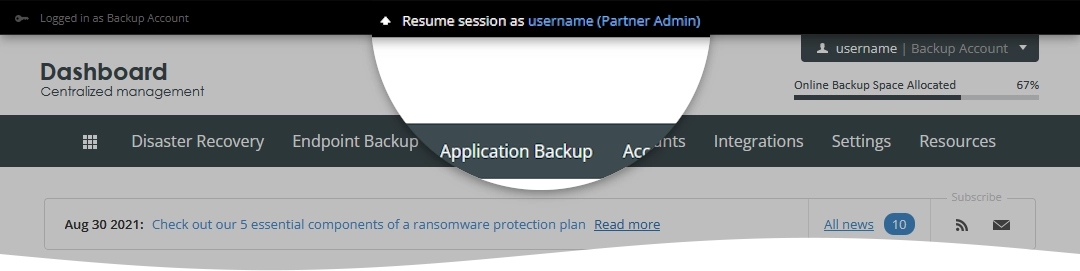
In other words you can use “login as” option only once. To use it again, you have to resume the session first.
How to back up a network drive or a location?
How to calculate approximate upload speed of the backup?
Calculating checksums in the Cloud Backup upload dialog
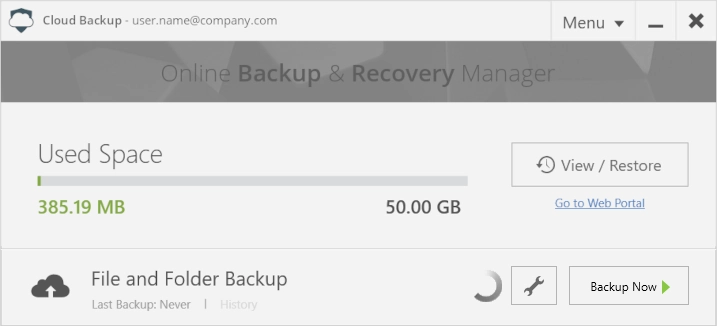
Cloud Backup requires the calculation of checksums. This helps ensure that your backups are efficient and complete as fast as possible.
The speed counter is an average counter and will be most accurate when backup is in the middle of a folder with similar file types. Smaller files will report slower speed since they finish faster and larger files report faster speeds. There is a greater disparity between this for users with fast upload connections.
There are sites like Speedtest to check your upload capability. The upload amount reported will help you establish an idea of what your connection is able to do. There are many factors in a connection that effect speed and this is just one of many ways to learn about your connection.
Below is an example of how Cloud Backup looks when calculating checksums.
Once in the middle of file transfer, you will see something like this:
How to change location of temporary folder created by Online Backup and Recovery Manager for macOS?
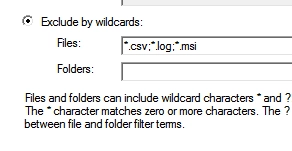
Correct syntax for adding exclusions in Online Backup and Recovery Manager
When setting exclusions in inclusions in Online Backup and Recovery Manager, you will need to do so in the following format: *.extension.
Here is a screenshot with the exclusions properly mapped:
How to manually install online backup service offsite?
How to recover backups to a different computer?
How to recover data to an external drive in Online Backup and Recovery Manager for Windows?
Open Online Backup and Recovery Manager, and sign in to your Infrascale Cloud Backup account.
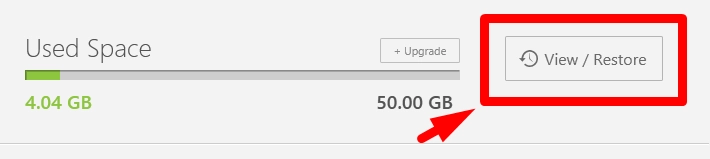
Click View/Restore.
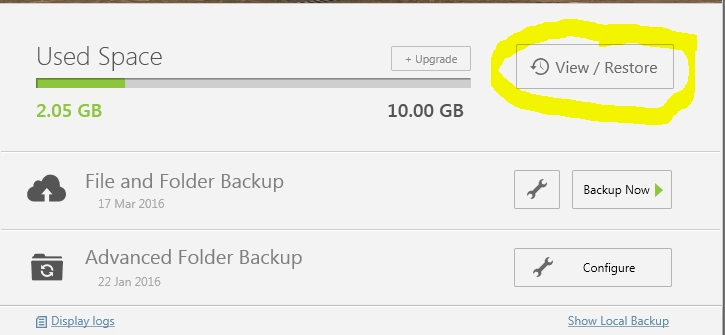
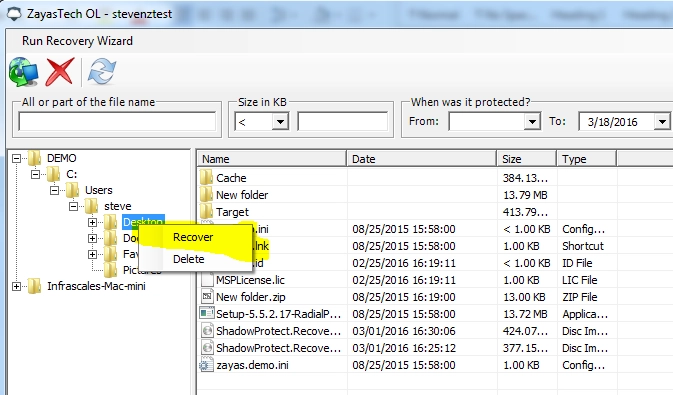
Find a folder or a file you want to recover, right-click it, and then click Recover.
Click New Location, and select your external drive.
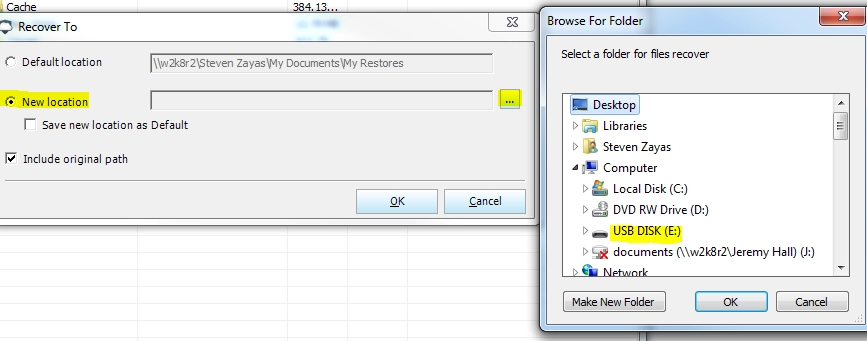
Click OK to start recovery.
How to recover data backed up before specific date in Online Backup and Recovery Manager for Windows?
To recover data backed up before specific date in Online Backup and Recovery Manager (OBRM) for Windows, follow these steps:
Open OBRM, and sign in to your Infrascale Cloud Backup account.
Click View/Restore.
Click Run Recovery Wizard.
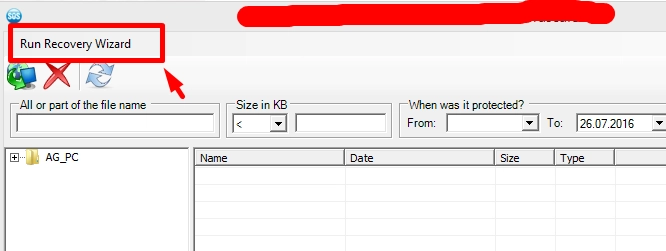
Pick a date in calendar, and then click Next.
Dates in bold are the actual dates when backups were performed.
Select files or folders to recover, and then click Next.

Select where to restore the data, and then click Finish.
Recovery may take some time depending on the number of files, their total size, and internet connection speed.
How to remove backed up devices, files, or files from the cloud?
How to remove or limit file versions stored in the cloud?
By default, there is no limit on the file versions stored in the cloud for the File and Folder Backup and the Advanced Folder Backup (with Forever Save policy).
Backup accounts, which use our cloud servers, are not affected by many file versions since only one MAX Baseline is calculated against their used space.
Nevertheless, if needed, the company, partner, and distributor accounts can use special tools to clean up old and deprecated file versions from other backup accounts.
You can remove or limit file versions stored in the cloud either at the backup account level or at the entity (company, partner, distributor) level.
File versions management at the backup account level
Sign in to your account in the Infrascale Dashboard.
Go to Endpoint Backup › Backup Accounts.
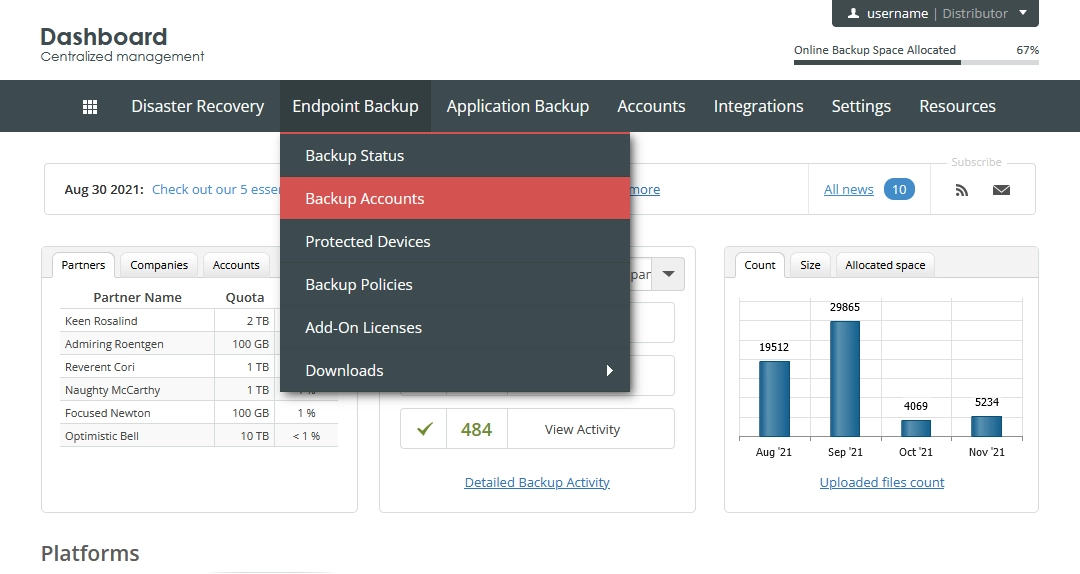
The consolidated backup accounts page opens.
Find a backup account to clean the file versions in the cloud for.
Click Actions (
 ) in the last column against the backup account record, and then click Cleanup Account.
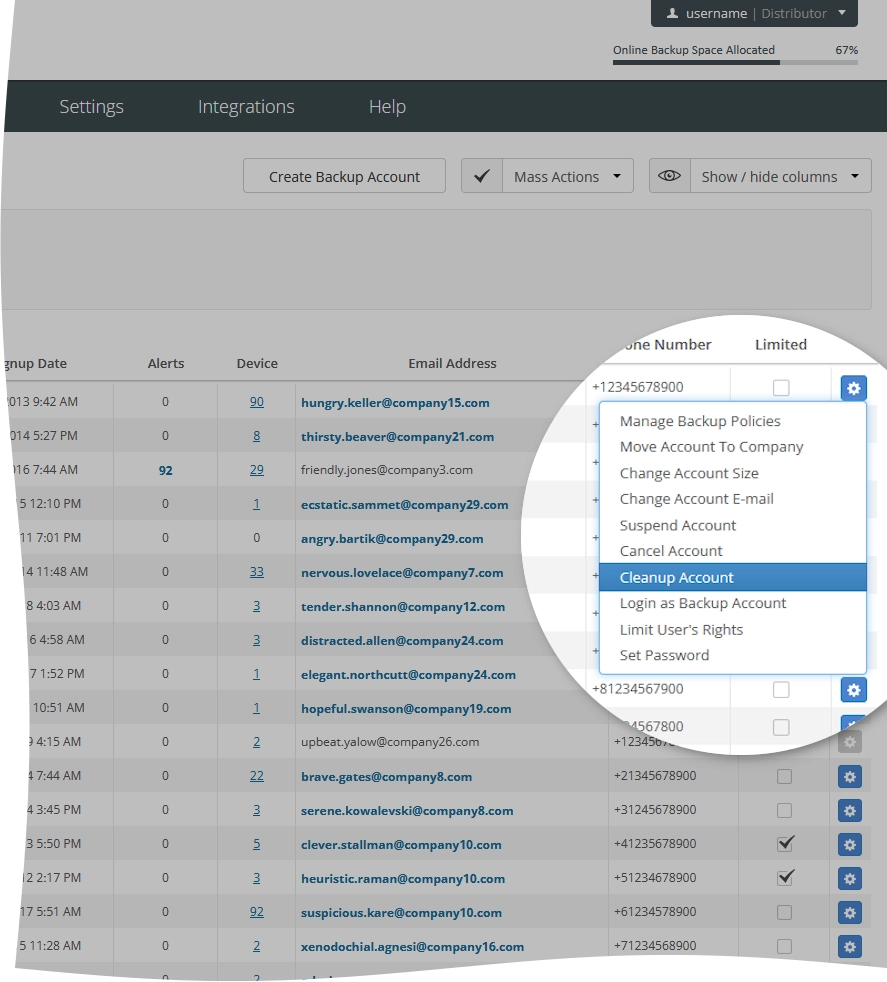
Select the protected devices associated with the backup account to clean the cloud data for.
On the Versions tab:
To clean file versions for all backups, select Keep latest
Xversions of files, and enter the number of file versions to keep.To clean file versions for Microsoft Exchange Server backups, select Keep latest
Xversions of Exchange backup, and enter the number of file versions to keep.To clean file versions for Microsoft SQL Server backups, select Keep latest
Xversions of SQL backup, and enter the number of file versions to keep.
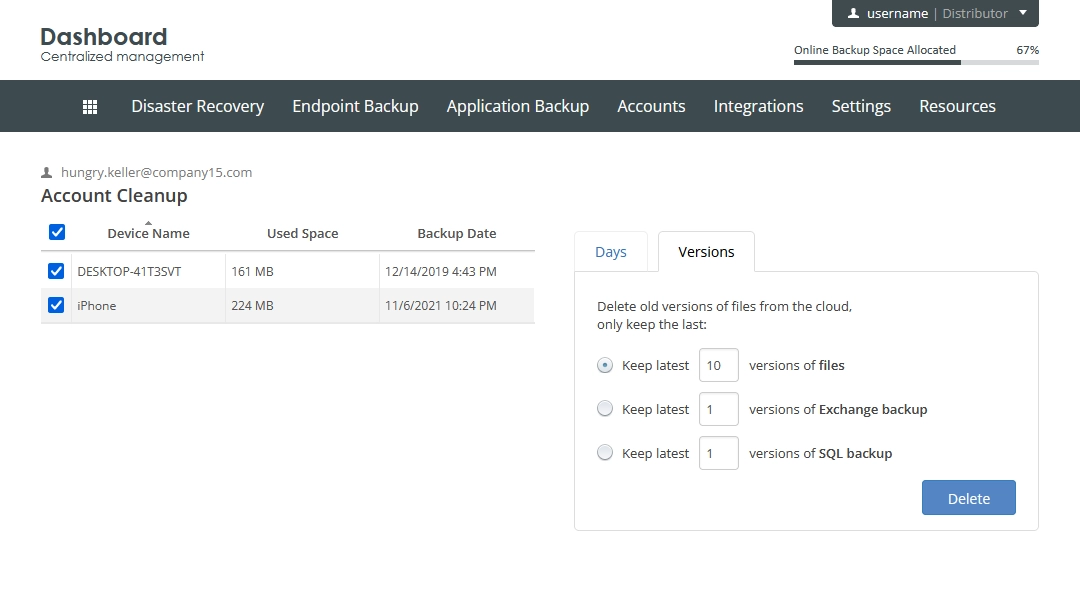
Click Delete to clean the file versions.
The system will keep the specified number of versions of each protected file stored in the cloud, and remove all other versions.
File versions management at the entity level
Sign in to your account in the Infrascale Dashboard.
Go to Settings › Backup Accounts.
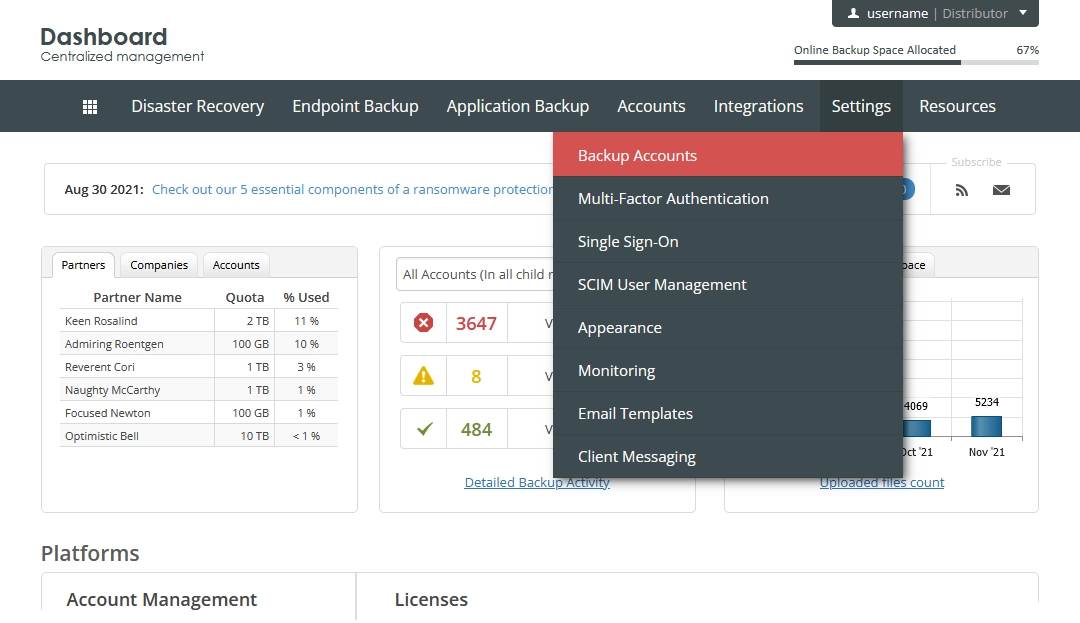
The page with global settings for backup accounts opens.
Select Limit the number of the latest file versions in the cloud, and enter the desired number of file versions to limit to.
This limits the number of versions of each protected file stored in the cloud for all direct backup accounts and backup accounts in sub-companies.
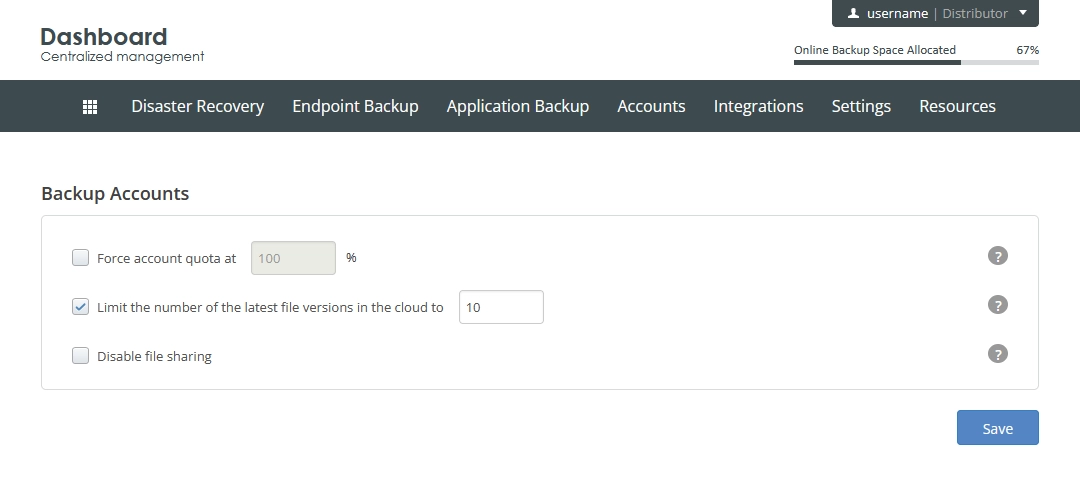
Click Save to apply changes.
How to import Microsoft Exchange Server mailbox data from PST files backed up by Online Backup and Recovery Manager?
How to run a scheduled backup in the Sleep, Standby or Hibernate mode?
How to set up end time for a backup?
How to share backup data?
The size of a shared file or folder should be less than 2000 MB.
To share your backed up file or folder:
Sign in to your Infrascale Dashboard account, and click Cloud Data.
Find a folder or a file you want to share.
Click Manage (
), and then click Share.Fill in all boxes, and then click Share.
The person you shared a file or a folder with will receive an email with a link to the shared file/folder.
To stop sharing a file or a folder:
Sign in to your Infrascale Dashboard account, and click Shared Data.
Click Unshare in the Actions column against the file or folder you want to stop sharing.